Tile leveling systems are more than just for professional tilers. Everyone is using them now to create beautiful tiled surfaces without lipping issues.
Unfortunately, there is a distinct lack of information on how to use these kits properly and it’s no surprise there are plenty of questions!
This article is here to answer the most common tile leveling questions from across the web.
• Will using a tile leveling clip create empty voids underneath the tile?
When you use a tile leveling clip, you are not creating an empty void underneath the tile material. This is a very common misconception with these tile leveling systems and everyones biggest concern.
When you are tightening the clip into place, you are pushing the tile down, not up and out of the thinset/mortar.
Instead of pushing a tile up to evenly match the surface of the other tile, it’s pushing the lipping tile down flush with the neighboring tile to create an even surface.
This is achieved by your low tile which has enough suction with the thinset that it won’t pop up during the tightening of the clip, instead it will hold in place and will bring the high tile into position with it.
Of course one clip isn’t enough to remedy a trouble spot, hence that’s why you use the tile clips in all corners of the tiles and push them all down.
Your tile is still achieving 100% coverage (provided you troweled the thinset properly).
Also remember that the clips make micro-adjustments, they are not moving your tiles around in large increments.
To put it plainly: Your low tiles have enough suction to bring any high tiles down to their level when you tighten a tile clip.
You are not pushing low tiles up but pushing high tiles down.
• Can a Tile Leveling System fix bowed tiles?
Yes, a tile leveling system can correct bowed or warped tiles and help eliminate tile lippage.
Plank tiles and large format tiles are commonly warped or bowed. Meaning they are not perfectly flat, usually they have a dip in the center or all 4 corners do not evenly touch the surface.
A tile leveling lippage kit in combination with your thinset will push down all corners of the tile and effectively even it all out. You can use tile strips or weights to hold down tiles but that’s not very practical.
This works on the same principle as the first question, with the suction being able to straighten out tiles and bring their corners flat with each other. Despite their tough appearance, tile material can be slightly bent.
They have have become a mainstay for wooden plank tile installations as those tiles are so commonly warped. You don’t need the best tile leveling tools to straighten plank tiles but don’t opt for the cheapest either as it won’t be strong enough.
During the mortar setting time, the tiles will get stuck in that position and adhere to the subfloor surface.
• how to remove tile leveling clips
Here’s one that I see mentioned a lot online, ‘how do I remove tile leveling system clips without it breaking inside the grout line?’
This question arises mostly from the first time users of these leveling systems and those using a cheap tile leveling system and not the best tile leveling gear on offer.
Apart from that, it happens because they haven’t learned the best way of removing the wedge when they are getting the tiles ready for grouting.
What happens is they kick out the wedge and the plastic clip snaps above the floor tile or just high enough for it to stick out during grouting.
Resulting in a time-consuming task of cutting out the plastic from the grout line before grouting.
We ain’t got time for that nonsense!
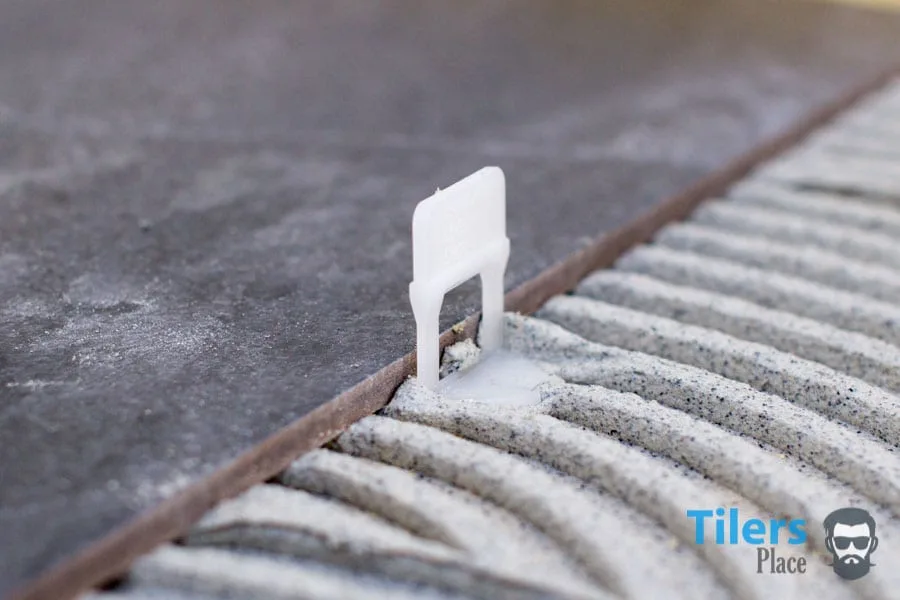
The idea behind removing tile levelers is simple**;** strike the plastic at the base where it meets the tiled surface. Don’t hit high, or at the wedge/disk.
Check my how to use tile leveling systems guide for more instructions!
AIM FOR THE BOTTOM OF THE TILE LEVELING CLIP
How you do it is up to you, but for floor clips, I just walk in and kick them out with my boot. My foot kind of skims the surface of the tile as I am aiming for the bottom of the clip, where the most force will transfer to the breaking point beneath the tile.
You can use a rubber mallet as well and it is recommended for tile clips used on walls for obvious reasons. (We can’t walk on walls sadly. Gravity sucks huh.)
Also, try do it with a short but sharp motion, like you would kick a car tire at a sales yard.
A nice, quick kick will ensure the top part of the clip comes off cleanly from the base and you can just sweep up the parts after.
Easy!
After you get the motion down you will never have trouble removing tile clips again.
I can’t say I have had any plastic remaining in the tile joints for many years now and once you master the easy technique, you won’t have trouble getting clean results either.
how to remove tile leveling clips from wall
Removing tile leveling clips from a wall is a similar concept to removing them from the floor. Simply use a rubber mallet and strike at the base of the clip. The key is to hit as low as possible to the tile to ensure the clip snaps off cleanly. Use considerable force so it snaps cleanly and once you got a few done, you’ll get a feel for it and will break off all the clips without any issues or broken clips.
Striking too high will result in the clip breaking above the grout line. (read below on how to remove broken tile clips).
• Am I a bad tiler for using tile leveling clips?
No, you are a wise tiler for using all the tools and inventions out there to achieve the best tiling result possible. Tiles are constantly changing with bigger and bigger sizes coming onto the marketplace, it is only natural that you need new tools to accommodate these new wall and floor tile.
See the section below for my answer/rant on that subject.
when to remove tile leveling clips
The question of “when can i remove tile leveling clips” is another common but nonetheless excellent question for every first time user of these systems.
A tile leveling clip should be removed after 24 hours or after the tile thinset has cured properly. Keep in mind that some thick bed adhesives may take longer, whilst quick drying thinsets are ready after only 2-3 hours. Use manufacturer guidelines as a general rule of thumb and if you are unsure, wait longer.
It’s key to never remove the tile leveling clips whilst the thinset is still wet. This is because any effect that leveling system may have on the tile will be ruined. The tile may slump down and create a lip or even bow back if it’s a wooden plank tile. Remember that a leveling clip physically holds a tile in place whilst the thinset cures. Until that thinset is hard, it needs that clip to hold the tile in place.
how to remove broken tile leveling clips
So you’ve gone and broken a tile leveling clip and it’s stucking above the grout line. What on earth do you do now?
Don’t worry, literally everyone that’s ever used a tile leveling system will have broken a tile leveling clip incorrectly. It’s a right of passage for every tile setter – you’re not alone.

A broken tile leveling clip can be removed by cutting the plastic tabs of the clip with a sharp utility knife. Tajima knives are my favorite for this as their super sharp amd long and thin enough to fit into the grout line. A box cutter shouldn’t be used as the blade is too short.
Simply insert your knife as far into the grout line as possible and cut along the plastic tabs of the leveling clip untill it breaks off. Three or four cuts along the same line should do it.
Professional Tiler Top Tip To Removing Broken Leveling Clips
Here’s one you won’t see on the internet as its a tip pioneered by the pro’s and passed around unofficially. (They’ll hate me for sharing this.)
If you have plenty of broken leveling clips to remove, you can heat the blade of your utility knife and cut them out much faster. A small blowtorch can be used to heat up the blade and then used to cut the plastic. It goes through like butter and makes the most tedious jobs a walk in the park.
*Please use extreme caution when using this method. Thick leather gloves and eye protection are recommended.*
More Tile Leveling System Questions
Should I Use a Tile Leveling System?
A tile leveling system should be used to greatly help alleviate issues associated with bowed wooden plank tiles or large format tiles slumping during curing. You should also use a tile leveling system for installing wall tiles to fine tune the levels and achieve a perfectly smooth finish. A system with wedges will provide optimum results.
Are tile leveling systems necessary?
Tile leveling systems are necessary to those seeking to achieve a perfectly flat surface, regardless of the tile used. Of course proper surface preparation is required before tile installation however large format tiles or wooden plank tiles often make tile leveling systems necessary to avoid lippage.
Who makes the best tile leveling system?
Who makes the best tile leveling system cannot be answered as there are many a great system for every type of tile whether it is for walls or floors. Each deliver great results. The Best Tile Leveling System Review by Tilersplace is the only review written by a professional tile setter and talks about four of the best wedges and clip systems for all users. Overall, the Raimondi leveling system was regarded as the best for first time users. Thanks to it’s price and high level of installation uses across all modern porcelain tile.
How do you stop a Lippage from tiling?
Tile lippage can be stopped by making sure that the subfloor surface is as flat as possible before any installation of the tiles begins. Use a correct trowel and thinset thickness for the tile and carefully place each tile to help reduce the risk of lippage. Sometimes it is required to lift the tiles and add more thinset/mortar as required. Lastly, use of a tile leveling system can help fine tune your tile levels, eliminate tile warpage and keep them inplace during the thinset curing/mortar setting process.
How much tile Lippage is acceptable?
Tile lippage is acceptable as set by the ANSI A108.02 Standards. 1/32’ plus the inherent warpage of tiles as stated by the manufacturer is the allowed tile lippage for floor tiles using a grout joint of 1/16’ to less than 1/4’.
Best tile leveling system for DIY?
The best tile leveling system for DIY use would be something like the QEP Lash system. It is a cheap and adequate system for users only doing a couple odd jobs around the house. It’s a nice little system that will tolerate domestic tile installations done for home improvement purposes. Read a customer review and some customer questions before buying.
When To Use Self Leveling Tile Spacers?
A self leveling tile spacer can be used on any tile on any surface that the tile installer wants to be perfectly flat. Wooden plank tiles can also benefit from these kits as they can fix the bowed effect these tiles are inherent with. Large tiles such as 32inch (600cm) tiles should always be installed with such a kit.
Why Use Self Leveling Tile Spacers?
Tiles are an expensive investment and are time consuming to install. When going all that effort to install a finish, it makes sense to strive for the very best result possible. These systems help tile layers to fine-tune, remove tile warpage and maintain a flat surface that won’t have eye-catching lips.
What are Wedges, Tile Strips & Tightening Tool?
These are just alternate names or individual names for various tile levelling systems. Any tiling system will have a wedge or tile strip that holds the tiles in place. The tightening tool is the adjustment pliers that you use to push the wedges/tile strips into place between the tile gap.
Do I Use 1/16, 1/32 or 1/8 Leveling Clips
Most tile levelling systems come in a variety of clips sizes ranging from 1/16, 1/32 and 1/8 depending on the requirements of the user. Generally, you want to use a system clip that corresponds with your spacer size as you need the lippage clip to fit in the tile gap and provide the desired results. 1/8 are mostly the most common size used and are the easiest to find. 1/32 is the smallest size available and not all shops carry the 1/32 lippage clip size. 1/16 is second most common and many lippage clips come in this size. The Ogori lippage system comes in all these sizes including 1/32.
Wedges in these kits are the same and do not vary in size. You can mix and match wedges as well between lippage systems, which saves you money if you using various kits and wedges.
What Is Tile Lippage?
Tile lippage or lipping is when one edge of the tile is higher than it’s neighboring tile. This creates a slight ledge that is visible and can catch feet when walked over. Lippage isn’t officially recognized as a word in any dictionary but all tile setters know it.
Top Advantages Of Using The best tile leveling system
There are many advantages to using a tile leveling system, in fact their pros far out weight the cons.
Advantages of Using A Tile Leveling System:
- Easily level floor tiles
- Fine tune Wall Tile for perfect walls.
- Prevent tiles slumping during adhesive cure time.
- Save time fine-tuning tiles
- Straighten out crooked wooden plank tiles
- Prevent tile lippage once and for al
- Even grout lines
- No more clients calling you up about fixing a “lipping tile.” – Bet you’ve heard that one a few times.
Disadvantages of Using A Tile Leveling System:
- Costs a few bucks more
- Takes a few seconds more to lay a tile
- Adds time to clean up time when grouting
- Makes grout lines harder to clean
- One more tiling tool in your work vehicle.
Check Out The Best Tile Leveling Systems
Raimondi Leveling System


Spin Doctor Leveling System


Perfect Level Master Tile Levelers


Check Price – Raimondi Leveling System Starter Kit
Check Price – Spin Doctor Lippage Control Leveling
Check Price – T Lock TM Complete Lippage Leveling
Shop Related Products At Amazon.com
6 Comments
Francesca – June 23, 2022
How are these used on a high polish porcelain surface? We have had work stopped now for 5 weeks, the installer scratched all the tiles with the leveling wedges. Every tile is marked under where the wedge was.
The tile manufacturer claims this batch of tile was not defective and that the surface is a standard industry acceptance (meets all
the ANSI (American National Specifications for the Installations) requirements. During
the last 12 months we have sold 1,000,000sf of products in this category), We cannot move in, and are now struggling to resolve this. The installer claims it’s not his fault, these are used all the time. He is wanting to of course blame the tile company.
Do you know if this happens and if so what have you seen are the reasons for scratches under these wedges? I researched and found protective plates, but if there was debris under those, they would still scratch. Installing flooring seems like there is a lot of debris in general from the mortar dust. These tiles were not yet grouted. I had all work stop after seeing all these floors scratched under the clips and just in general all over abrasions. thank you in advance for any tips or experiences you have had or seen!
Mike Natlacen – June 5, 2023
I tend to have to agree with the tiler. If using these clips is scratching the tile then what are you expecting with the finished floor? It sounds like it will get all scratched up in no time. We once had the very same issue with a polished marble and this was before tile levelers even existed. We had the floor polished after the tile was laid. I don’t need to tell you what the floor looked like just a year later.
shiloh – July 21, 2022
How do you remove the thinset after removing the tile leveling clips? Thin set builds up under the leveling clips so it isn’t an option to clean as you go process. The thin set builds up under the clips so when you remove the clips there is dry thinset build up under the clips making it difficult to clean so you can start the grouting process. So now I am trying to search for the safest and best way to clean the thinset off so I can grout. A process that won’t scratch or chip the tile. Any suggestions? Is this a common thing with the leveling clips? The next project I do is there a process or step I am missing in order to prevent this extra work?
Diane Umperovitch – August 12, 2022
Carl,
I have a question. Unfortunately, I had my entire floors tiled but the contractor did not use a leveling system. I purchased LASH and plan to have it repaired in the most visible areas that have lippage. Can I use this system on repairs? Meaning some tiles being replaced will be next to tiles staying down. Should I shave off half the clip? Any others ideas? I appreciate any advice.
Carl Anders – September 5, 2022
Hi Diane, You can remove some of the mortar from the pre-existing tiles and slide the clip into place. You can then install the tile and fasten the wedge. The old mortar will be solid so try a stiff putty knife or ideally a multi-tool with a flat blade attachment to cut some out. It shouldn’t be a hassle.
Deborah Burton – February 11, 2023
Hi Carl, I have a question. I have purchased the leveling system to tile about 11sqm with 300x300mm floor tiles. My problem is the screed floor runs down hill bu 10mm. My biggest problem is that it runs towards a uvpc door with only 25mm clearance. I have purchased floor leveling compound but obviously have to be mind full of the door clearance. My tiles are 8.6mm . So basically if I were to level the floor perfectly my door won’t open by the time I add 6ishmm for adhesive. Will the tile leveling system still work if there is a slope of about 5mm over a distance of 3.5m or will it fight to pull up level by the time I get to the door. Pulling my hair out with this one and now tempted to just do it manually. Any help would be appreciated !
Gary Cole – August 23, 2023
Hi Carl, A tiler installed our bathroom tiles and in some places after a shower we get water marks on some tiles outside of the shower area where the leveling clips were used. It seems like condensation, but I’m sure this shouldn’t happen. Have you any ideas or seen this before?
Carl Anders – September 10, 2023
Hi Gary. That’s interesting, I have never come across this. Are the tiles polished? My only ideas is that the clips created micro scratches in the glaze and the scratches of the ridges are enough to capture water vapor. Not a lot, but enough to stand out from the surrounding tile surface. Without photos it’s hard to discern the problem.
Jan – October 18, 2024
Recently had a issue with the levelling clips chipping the edge of a large format (13x39) rectified ceramic wall tile. Every tile ended up with chips where the clips were, not sure if this happened when the wedge was inserted or during knock out. The chips are small so was not immediately noticeable. Would a spinner type clip be better in this application?
Carl Anders – October 22, 2024
I’m baffled by this, I’ve never had such a problem and I use wedges on a daily. Maybe the glaze of the tile is very thin?
A spinning type system should alleviate these problems as you are putting equal pressure across the surface of the tile, and not touching the edges. You can give those a try. Even the cheapest spin type will be worth trailing out.


Leave a Comment
Your email address will not be published. Required fields are marked *
Comments are currently closed for new submissions.