Welcome to my complete guide showing you how to change a tile saw blade.
It is quick and easy to follow.
With fully detailed photos, you will have all the information you require to replace your diamond blade without issues!
By the end of this guide, you will have all the tools and knowledge needed to replace your tile saw diamond blade.
Knowing how to replace the blade in your handheld tile saw is an essential skill needed for tile saw ownership. After reading this guide you will be ready to add that skill to your tool belt.
The diamond blade on your tile saw will be the single biggest piece of maintenance you will be doing to maintain the longevity of your saws.
It is a part that is expected to wear out in time as it is very much like the tires on your car.
When they’re new they work great and perform at peak condition.
With time the surface begins to wear down with use caused my friction and heat and so the performance begins to decrease.
Like a car tire, you will need to eventually replace it when their ability to perform has been used up.
Good thing you found this guide huh, now you can replace that blade and keep on cutting!
How To Tell If Your Blade Needs Replacing?
Before we begin to replace your tile saw blade let’s go over a few symptoms to ensure it actually needs replacing.
•Check the blade for any cracks or chips
Take a good close look at your tile saw blade paying close attention to the outer edge of the blade.
Make sure to check all around the diameter of the blade, using one hand to turn the blade a full 360 degrees to ensure the surface is free of any damage.
Once you have inspected one side, flip the tile saw over and inspect the other side.
Take your time and inspect it thoroughly for anything out of the ordinary.
It is imperative you check your blade at least once a week as a damaged tile saw blade could lead to it exploding during use.
In over twenty years of tiling, I have been careful enough to avoid this happening to me however the idea of it exploding always curdles my blood.
I do not fancy diamond blade shrapnel in my face or stomach due to carelessness on my part and I really do not want that happening to you.
If you see any damage or chips in your diamond blade STOP any work immediately and replace the blade.
• Diamond blade fails to cut cleanly/chips surface of the tile.
This is usually the main reason I replace a diamond blade on my tile saw.
If it is damaging the glaze of the tile making it unusable in an install I will try to clean the surface of the blade, if that fails I replace it.
You do not have the time or want to risk your reputation by damaging tiles or using those damaged tiles in an install.
Imagine this damaged tile will be in a shower niche where the exposed edge is extremely high profile and seen constantly by the homeowner.
You do not want a chipped tile there or anywhere for that matter.
Do not risk a bad job by using a faulty diamond blade.
If the blade is ruining the surface, it is time to replace it.
• Diamond blade cuts very slowly/ burns during a cut.
This problem drives me up the wall and has me pulling my beard hairs out.
I cannot stand it when my tile saw takes minutes to perform one cut or starts throwing sparks instead of cutting.
This is due to the surface diamonds beginning to wear thin and the metal they’re are embedded in are doing the majority of the cutting.
Obviously metal will not be happy cutting a thick substance such as tile so sparks and an extended cutting time is the result.
I have also had the glaze of the tile being melted off during a cut.
This is partly thanks to subpar quality tiles mixing with a blunt and used up tile saw.
You do not want tile glaze dripping onto your skin or flicking onto your face, trust me.
It’s not pleasant and can be extremely painful.
If your tile saw is not performing how it used to, replace that blade!
Now that we know we need to replace our tile saw blades, let’s get on with the tutorial.
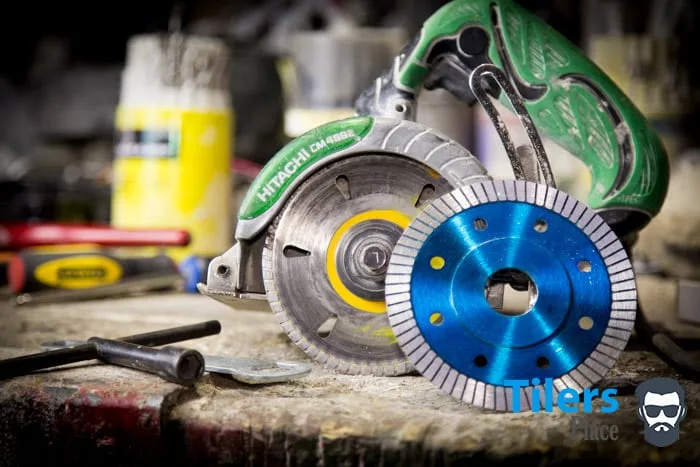
Please Note: I will be using a Hitachi CM4SB2 Tile Saw after it won my Best Tile Saws Review as an example.
However, this guide will apply to whichever handheld tile saw you have.
Whether it be a Makita, DeWalt, Husky etc and also applicable if they are dry or wet tile saws.
How To Replace A Tile Saw Blade – Step by Step Guide
Time Required: 5-15 Minutes Max
Tools Required:
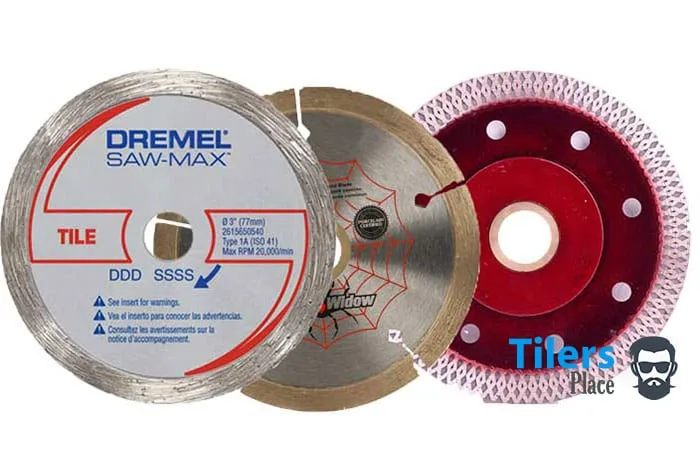
- New 4inch Diamond Blade
Click here if you would like to select from the largest selection available.
- Box Wrench and Hex Key
These two tools should come standard with any tile saw.
However if you do not have them then see below for alternative options.
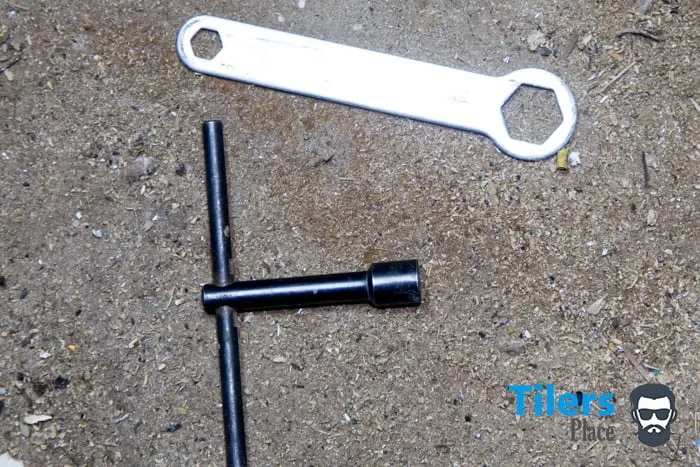
Alternative Tools
While not ideal, these two tools will do the job as well.
I have used this method countless times on the job site and works just as well.
Got everything you need? Great!
I told you it’s a simple job.
The chances are you already have most if not all the required items on you and are ready to replace your tile saw blade.
Now smile and relax as you have just done the second hardest part of this whole task. Tracking down those tools and parts required can sometimes take much longer than needed.
I once spent two hours searching for my box wrench and I could not continue work until I found it.
So really, crack a smile and continue reading!
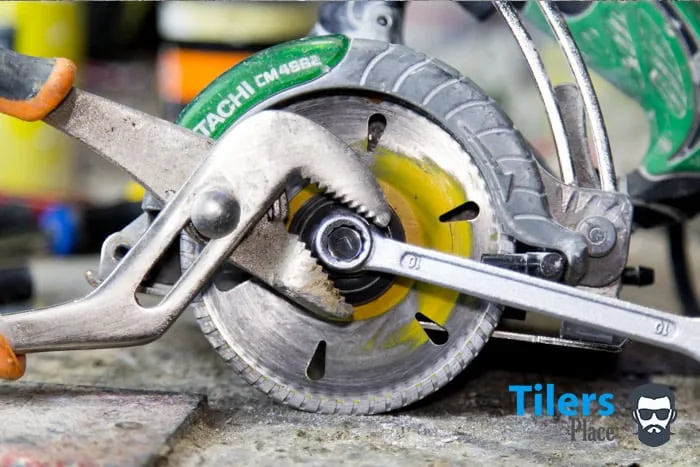
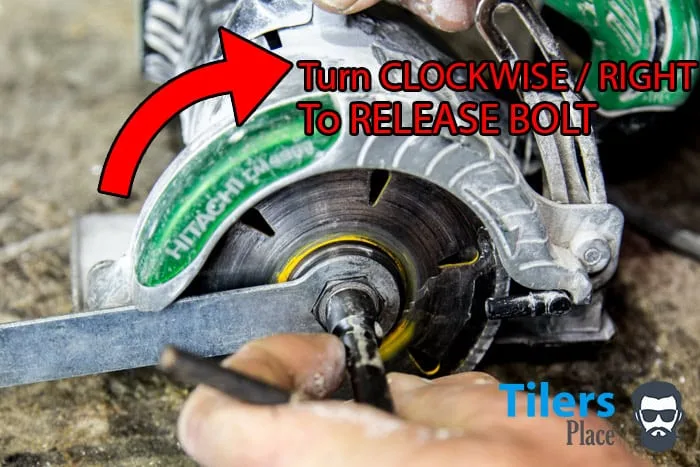
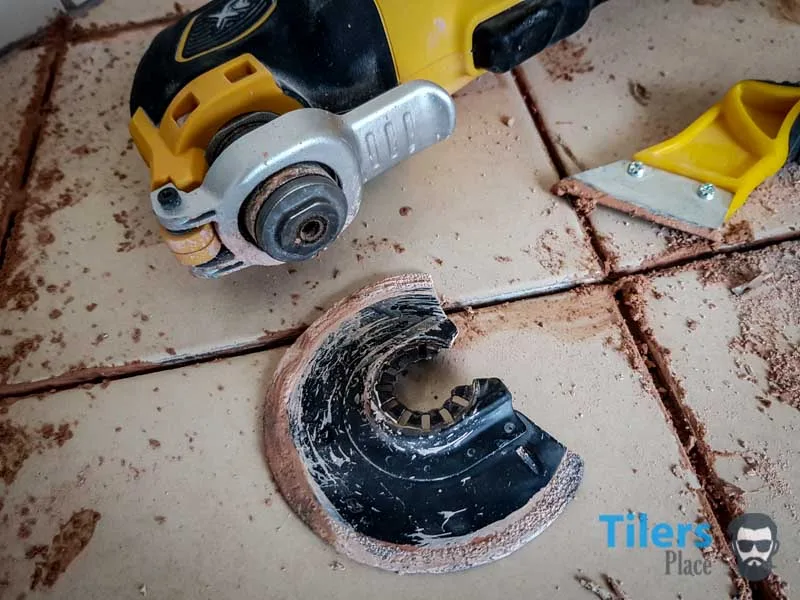
Step 1 – Loosen the Locking Plate
Brief Guide
•Apply both wrenches to the backing plate and central bolt.
•Lock the long wrench against the saw and twist the box wrench to the right.
•Throw away old blade but keep the central adapter ring if the blade has one.
Detailed Guide
Okay, this is the first step and by far the most difficult part of the whole task.
Luckily you have your friend Carl (that’s me!) to help you with this tricky process.
Before you start any work be sure that the tool is unplugged and away from any electricity!
Firstly take a look at the central bolt and plate holding your diamond plate to the tile saw.
Do you notice how there is the letter “L” written on it?
That letter is indicating that the thread and bolt are reversed.
What do I mean by that?
That means that the thread direction is reversed to conventional means.
When you turn the bolt clockwise (right) you are actually undoing the bolt instead of tightening it.
And so when you turn the bolt anti-clockwise you are tightening the bolt.
Confusing right?
The reason the manufacturers do this is to ensure the locking plate stays tight during use.
If there was a standard thread included in the tile saw chances are the blade would loosen itself over time due to friction and vibration.
With a reversed thread this is not a problem and it keeps your diamond blade secure without the need of retightening it.
Now that you understand why this is a factor, time to show you how to undo it!
Look again at the top image at the beginning of part one
Do you see how I have my two wrenches positioned on the saw?
The way they are made ensures that they only fit in their allocated slot.
The larger one goes over the backing plate hex pattern.
Slide it in and lock it against the left side of the saw. The left side is usually the opposite side of the arrow stamped into your tile saw.
If you are using the adjustable pliers this is the plate you will want to grasp onto.
Now that you have the backing plate locked up against the saw you will want to take your smaller box wrench and fit it over the smaller bolt with the “L” marked on it.
If you are using the 10mm wrench this is the bolt you will want to lock it onto. Use whichever end is most comfortable for you.
Okay, are both your wrenches in position?
Great!
With the long wrench locking the backing plate against the saw the diamond blade will not move as you undo the bolt.
With one hand grip, the tile saw firmly from the handle and with your other grab a tight hold of your smaller box wrench.
Using your strength twist the box wrench to the right and keep applying pressure till the bolt loosens.
If it does not give the first go try again.
You can try lightly tapping the bolt with a hammer to dislodge any dust that has solidified in the thread. Be very gentle as you do not want to warp the metal of the bolt.
Keep trying and eventually, it will release.
After it is loose you can undo the bolt with your fingers.
Place the bolt and backing plate off to one side and be sure to note how the backing sits so you can put it back the same way later.
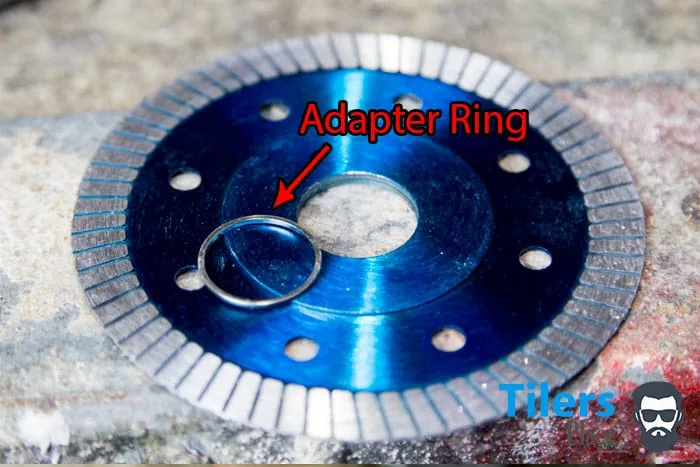
With the plate gone you should be able to remove the old diamond blade without difficulty.
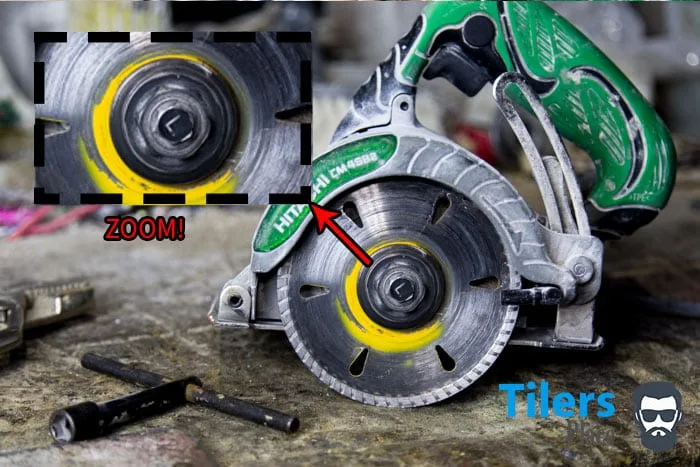
Do you see a copper colored disk in the center bore hole of the diamond blade?
If there is one you should pop it out with a finger and hold onto it.
Chances are you will need this copper ring (known as an adapter plate) for your new diamond blade.
This adapter plate helps marry the central shaft of your tile saw (known as the arbor) with the arbor size of your new diamond blade.
Without this adapter plate, your new diamond blade might have a hole too big for your saw.
When this happens the tile saw cannot make contact with your blade hence making it unable to cut!
You can wave your old diamond blade goodbye and discard it in the bin.
I like to hang mine around the garden as random decoration. It’s interesting to see the deep red rust setting in after a few weeks.
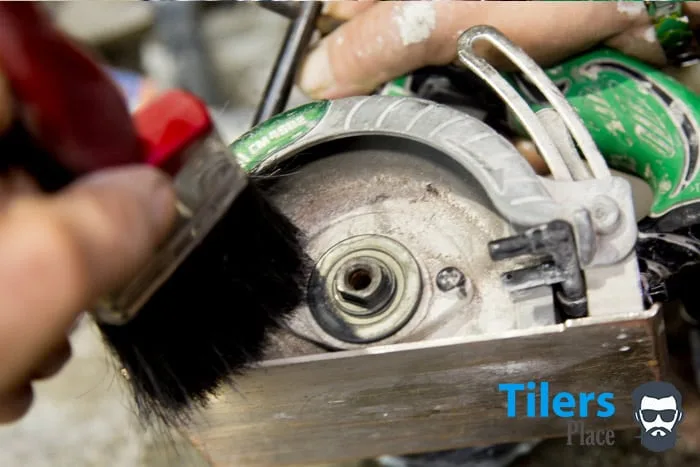
With the tile blade off you have access to the front of the tile saw.
Using a brush you can sweep away and clean up any dust and debris that has accumulated there.
Using a Phillips head screwdriver you can also tighten up the two screws that hold the central shaft plate in place.
STEP 2 – Mount The Adapter Plate
Quick Guide
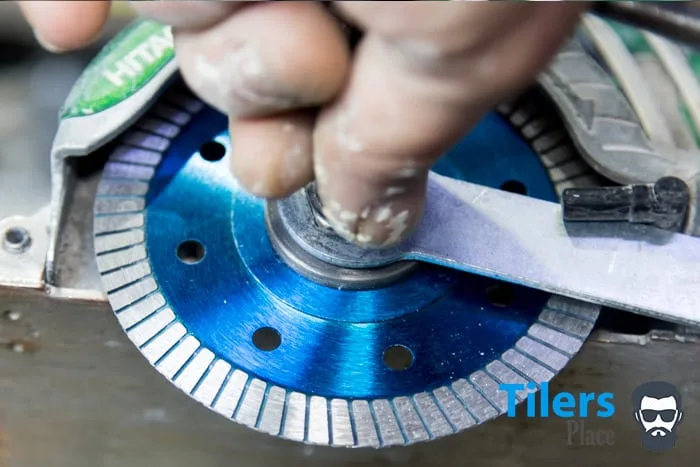
Take adapter ring and lightly push it into the central hole of the new diamond blade.
Ensure it is flat and level.
Detailed Guide
Now that we have the saw ready to accept a new diamond blade let’s get it setup!
I have found that every company seems to have their own version of an adapter plate.
Some fit nice and snug inside the tile blade while others are loose.
For best fitment of the adapter ring and to ensure you get a smooth, vibration-free cut it pays to do the following.
Place the adapter ring on a nice level and flat surface.
Then take a look at your new blade and look for the part that has writing and arrows indicating direction.
Take this side and place it evenly on the adapter ring so it fits over the hole.
Give it a slight even tap with the palm of your hand and it should enter the new blade evenly.
This attention to detail will ensure both the adapter ring and new diamond blade sit flush and even with each other.
Once the tile saw is turned on their perfect alignment will prevent any vibrations and jagged cuts caused by uneven ring placement.
Step 3 – Mount the New Diamond Blade
Quick Guide
Match up the direction indicators on the diamond blade with the direction indicators on your tile saw.
Detailed Guide
Now that you have the new diamond blade ready for mounting back onto the tile saw you are about half way done!
At this point, you are very close to replacing your diamond blade on your handheld tile saw and almost able to cut.
![]()
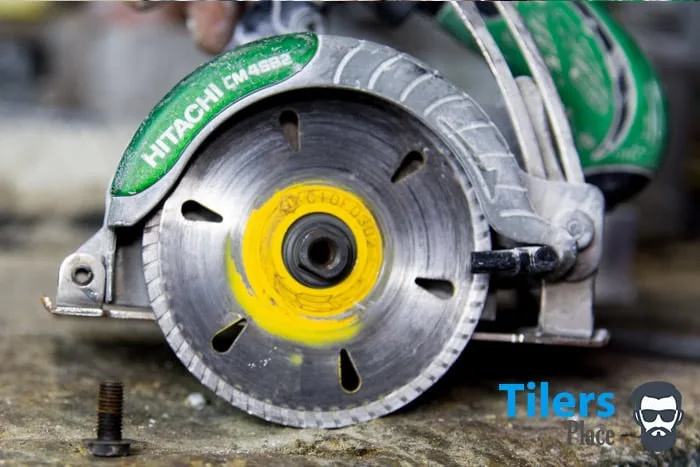
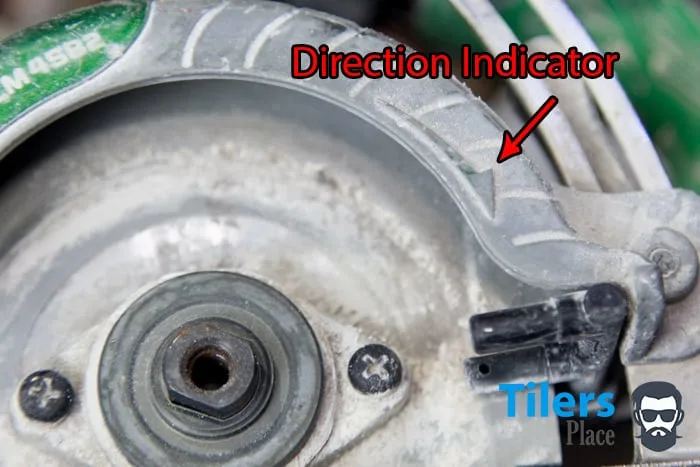
Before you are ready to mount the diamond blade back on the saw flip it over to the printed side.
Every diamond blade will have arrows indicating the spin direction it needs to follow.
Tile blades are manufactured to only cut in one direction.
Although it is hard to tell with the naked eye you can be assured the diamonds and grooves are made to cut optimally in one direction.
Take a look at the photos to see an example of the direction indicators.
Have you found them?
Good.
Now take a look at your tile saw and do the same.
Look for the direction indicator. It should be on the front side of the tile saw.
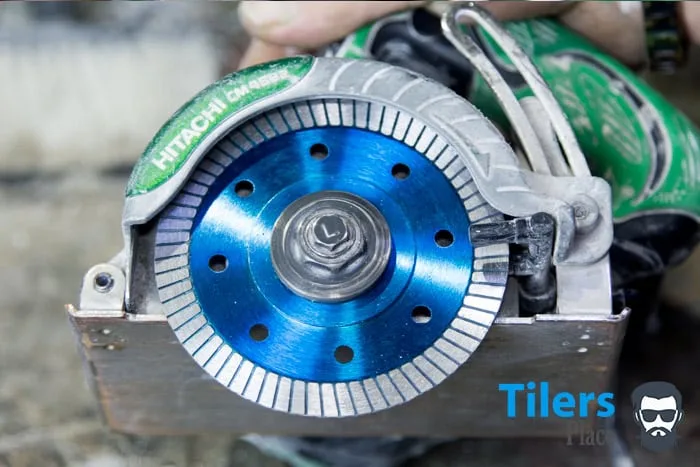
Now that you know the direction the diamond blade should be mounted, place the blade onto the central shaft of the tile saw.
Be sure to match up the arrows so they are both going in the same direction. (Clockwise).
I have noticed over the years that the printed side always goes into the tile saw so the print is facing away from you and the outside.
Although I have always seen it do this, it pays to make sure every time you mount a tile blade incase it is different.
Have you matched up the arrows?
Great work!
With the diamond blade turning in the direction it is meant to it will cut safely and accurately.
We are 75% done now, almost there!
Step 4 – Mount the Plate and Finish Up
quick Guide
With the blade sitting on the saw, place the large mounting plate over the central hole.
Make sure it sits flush.
Screw in the bolt anti-clockwise and test run the tile saw.
Detailed Guide

We are on the home stretch now buddy.
Place your diamond blade securely onto the central shaft and ensure the direction indicators are both pointing in the right direction/
If you are unsure be sure to double check before you tighten the backing plate back on.
Now pick up your backing plate, remember that is the bigger of the round plates you removed earlier and place it on the tile saw like shown in the picture.
As you can see the raised center with the hex pattern is on top.
Place it on the shaft and be sure it rests flat on top of the blade.
If it does not sit correctly simply rotate the plate with your fingers until it drops securely into place.
With the plate on you can now pick up your threaded bolt and using your fingers manually screw it in.
Remember the thread is REVERSED so to tighten it, you need to screw it in anti-clockwise(turning left).
With the threaded bolt now tightened up as much as possible with your fingers it is time to use the wrenches.
Get your long wrench and place it on the right side of the saw that contains the direction indicator.
With it in place and braced, you can now get out the box wrench and apply it to the threaded bolt.
Once again hold the tile saw with one hand and tighten the bolt with the other that is holding the wrench.
You will want to be turning the wrench anti-clockwise to tighten the bolt.
Tighten the bolt up hard but not overly so.
You will want to undo the bolt again sometime in the future when you will be replacing the blade.
Having it overly tightened will make this whole process much harder the next time!
Congratulations!
You have just learned how to safely replace a tile saw blade and you now have a fresh diamond blade to cut with.
I hope you have found this guide useful and easy to follow.
Replacing the diamond blade can seem like a daunting task at first but all you require is the right tools and a little bit of know how to get the job done.
Now that you have successfully replaced your diamond blade, why not go ahead and learn how to change your tile saw brushes.
I have a fully detailed and step by step guide that is very easy to follow.
Click here if you would like to check it out.
If you found this guide interesting and would like to read more about tile saws,
I recommend you check out my in-depth review of all the best handheld tile saws on the market.
You may even find a new replacement to your old tile saw.

Leave a Comment
Your email address will not be published. Required fields are marked *
Comments are currently closed for new submissions.