Tilers Place is reader-supported. When you buy through links on this site, I may earn an affiliate commission on qualifying purchases.
In-Depth DIY Guide To Grouting Tiles and Repairing Tile Grout
Full instructions to repair grout or grout any tiling project
If you are needing the ultimate tutorial on how to grout tiles and also how to repair grout then you have found it!
This grout replacement and repair guide is all you will need to know how to repair grout and will grant you all the confidence you need to take on the task.
Not only that, but you can use this guide to learn all you need to know about grouting your next tiling project.
Learn the top tips from an industry professional tiler who has been refining his trade for over twenty-five years. Want to learn how a professional tile setter grouts tiles? Well here you go! All the tips, no holds barred.
Are you ready to repair your grout and reignite the look of your tiles?
Let’s go learn how to grout!

This Grout Repair Guide Applies to:
- Grouting Tiles
- Replacing old discoloured grout
- Repairing cracking or missing grout
- Removing grout to replace a damaged tile
- Completely removing grout and applying a different grout color
How To Repair Grout – How To Use This Guide
This how to grout tile guide is two fold.
It deals with damaged grout in addition to teaching how to grout. So if you only need to grout tiles, then ignore the parts about removing tile grout and only follow the steps on grouting tiles. The practise is exactly the same whether you are grouting tiles from scratch or repairing old tile grout and applying a new coat.
Is your grout cracking, crumbling or just downright dirty?
As a homeowner and owner of tiles in my own home, I understand the anger and pain an ugly grout line can cause.
You invested so much in your tiled surface only to have the grout ruin the whole entire look.
I get calls every week from frustrated homeowners asking me if there’s anything I can do to fix their grout or they’re picking my brains asking how they can repair grout themselves.
After twenty-five years of working with every conceivable type of grout and replacing or applying hundred of miles of grout I reckon it’s high time, I share my knowledge with you in this how to grout tile guide.
Repairing grout or replacing grout is not as difficult a task as you might imagine.
The fact that you have found my grout replacement tutorial and are willing to learn tells me you have what it takes to do it.
Folks that have the drive to seek help and learn from others are the ones that get things done.
And they succeed.
The truth is, the hardest part of repairing and replacing grout is tracking down the few specialist tools you will require to complete the job.
Luckily I have done all the legwork for you and tracked down the best grout removal tools and grouting tools to get your job done in no time.
All you need to do is follow the links and add to cart.
Do it tonight and you’ll have the tools at your doorstep just in time for the weekend reno!
And do you want to know the best part?
Doing it yourself will cost a fraction of calling in a professional like me to do it.
And after you are done you can keep the tools or hire them out to your friends for their grout repair jobs.
It’s a win-win so I highly encourage you to try to repair your grout at home yourself, it’s a great DIY project and you will learn a lot by doing it.

Hi there and welcome to my How To Repair Grout tutorial!
My name is Carl and I have been tiling professionally for over twenty-five years.
As you can imagine I have played with my fair share of grout in that time and I know more about it then I know my wife.
Yes, sadly I have been tiling longer than I have been married so you can rest assured you will be getting the best grout removal tips and tricks.
Ready to get started?
Let’s run through the tools you’ll require for repairing your grout first.
Tools Required For Repairing Grout
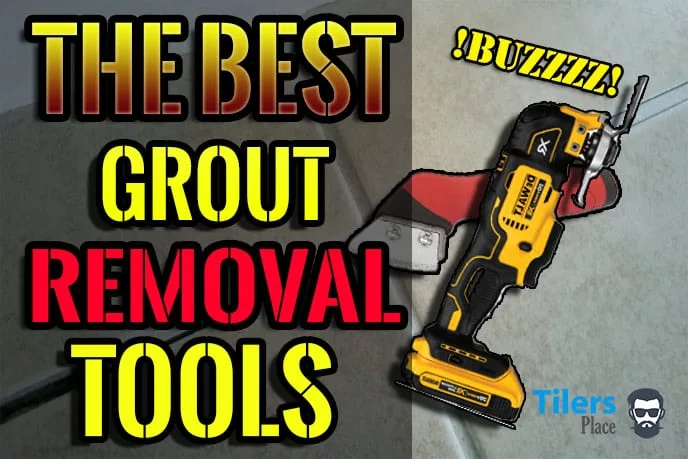
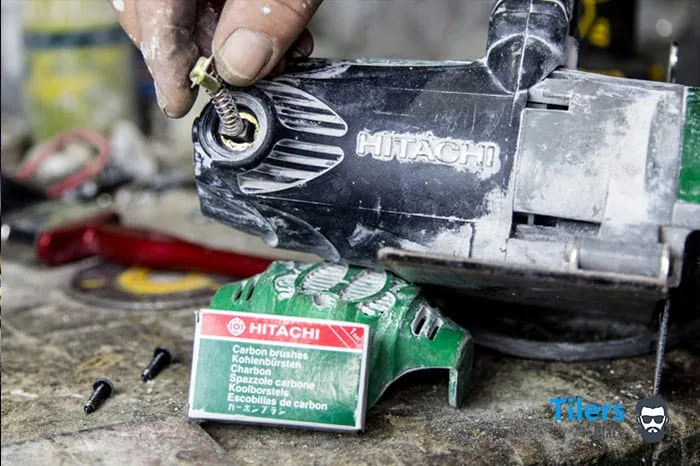
Grout Removal Tool
Whether you use a hand grout removal tool or a powered grout remover should be decided by your budget and grout type.
I have a complete guide to help you decide which or if you want the very best grout removal tool it is the Dewalt Oscillating Multi-Tool.
Please click the images if you want to know more.

Vacuum Cleaner/Broom
You have any one of these lying around your home.
Using these will ensure you remove any old grout and debris from the tile gap.
A clean gap is vital to ensure your new grout adheres properly.


Check Price – Armor Gallon Utility Vacuum AA255
Mixing Trowel
This will be used to mix the new grout.
Since grout mainly comes as a dry powder, you will mix it with clean water to achieve a creamy paste.
If you are using Epoxy then I recommend you use an electric drill with a spiral mixer attached.
Any trowel will do for your grout replacement task, if you want a suggestion on a good trowel then you can click the image.


Check Price – Hyde 18060 2” 5” MaxxGrip
Rubber Float
A rubber float is used to push and form the new grout in the exposed gap.
There is a whole variety available and the choice is overwhelming for a first timer.
I linked a great rubber float I use myself that works very well.
It has a thick rubber base that helps to push the grout in firmly without too much stress upon you.
The best part is it’s very cheap!
Click the image and add this bad boy to your cart.


Check Price – QEP 10061 Rubber Grout Float
2x Buckets/Pails
You will require two buckets/pails for your grouting job.
One will be used to mix and contain your fresh grout while the other will be for your wash up water.
Any bucket or container will do as long as it can hold two gallons or more.
If you will be only replacing the grout for one tile or two then you can use a small container for your grout.


Check Price – Fortiflex Gallon Utility Bucket Hunter
Sponge
Good ol’ classic sponge.
You will use one as your primary means of cleaning up the excess grout after you have applied the grout.
Simply wipe, rinse and repeat.
I have found a great bargain on a multi-pack that you can use around the home after you have finished your grouting project.
Considering the prices of sponges in stores, these are a steal!
Click the photo and add these to your cart. (I just ordered some myself actually, these are really cheap!)


Check Price – QEP 70005Q 6D Grouting Cleaning Washing
Grout
This is the stuff you will be applying to your freshly cleaned grout lines.
It comes in a few different kinds either premixed or in a dry powder form.
The one you see here comes premixed and ready to use.
It will cure upon contact with oxygen and use is very easy.
Simply remove some from the tub using your trowel and apply.
This one is great for small jobs and first-timers.
Of course color choice is a factor so follow the image link and find a color you like.


Check Price – Custom PMG165QT 1 Quart Premium Delorean
Buffing Rags
You will want a handful of clean rags to buff your tiles clean after grouting.
Ideally these should be cotton and not too rough so they don’t scratch the grouts finish.
A lot of places sell bags of rags ideal for this purpose.
You can use old clothing or tea towels but be careful of any buttons or other features that can likewise scratch or damage the grout.
Click the photo for a link to a great selection of rags suitable for buffing tiles.


Check Price – Towels Commercial Machine Washable
Recommended Safety Gear for Grout Repair
Repairing and working with grout can expose you to many hazards including harsh alkalines so it is important you keep yourself protected.
I highly recommend that you use the following safety gear to ensure you stay safe and avoid any nasty health hazards that grout repair can expose you to.
Rubber Gloves
Tile grout contains many harsh alkalines that can damage your skin or cause excessive drying of the skin.
I highly recommend you use some rubber gloves.
You don’t need anything fancy for grout repair either which is great.
Just some simple rubber gloves you have under the kitchen sink or even disposable gloves.
I find they work the best for grouting tiles as they do not hinder your touch sensitivity or get in the way during work.
I linked my favourite type of nitrile rubber gloves that are very tough and never tear during a grout repair job.
Click the image if you’d like to get some as well.


Check Price – Nitrile Disposable Thickness Textured
Knee Pads
If you will be repairing grout, chances are you’ll be doing the bulk of the work on your knees.
That’s why an adequate pair of knee pads are essential for your grout repair job.
Keep your knees protected during those long hours spent on your knees and you won’t end up with any pain or problems.
I have written a lot about knee pads so if you want some recommendations on which pair of knee pads is the best check out some of my articles.
If you want a quick recommendation then the NoCry Professional Knee Pads will work great for your grout repair job.
Ear Muffs
These will be necessary if you will be using an electric grout removal tool like the DeWalt DCS355D1 with the grout removal blade.
While the grout removal tool isn’t loud, the constant buzz it emits can be straining on your ears.
It is proven that exposure to the same sound frequency for extended periods can damage hearing so it’s best to keep it safe.
Slap a pair of these around your ears and you’ll be safe from any aural dangers during your grout repair job.


Check Price – NoCry Professional Comfortable
Check Price – 3M Peltor Earmuffs Yellow X2A
That’s it!
These are all the tools you need to repair grout or replace old troublesome grout.
The best part is you can find most of these at home and the rest are a quick Amazon shopping trip away.
Why don’t you go now and purchase whatever tools you will need then come back and learn how to repair your grout.
Any tools or safety equipment you require are linked, simply click on the images and add whatever you need to your cart.
Your order will get shipped while you learn and it’ll arrive in time for the grand weekend task of repairing grout.
Once you read this how to guide you will see how easy this grout job is and chances are you will complete the job without needing to come back and read it again.
Okay, we got the grout removal tools, we got the new grout and plenty of sponges.
Time to repair some grout in your home!
How To Repair Grout – Quick Guide
I understand you might be eager to get going and begin fixing your grout immediately so I prepared a quick guide.
If you want detailed instructions on how to repair grout then please scroll down to the in-depth grout removal guide.
How To Repair Grout
Pre Prep:
If your tiled surface is dirty or has old staining it is a good idea to clean them before you begin repairing your grout.
Give the tiles a thorough clean with mild detergent and a cloth to ensure this dirt doesn’t get into your new grout.
If you to learn how to maintain the look of your tiles without chemicals check out my article here where I reveal the best way to clean tiles.
Step 0: PUT ON YOUR SAFETY GEAR!
Step 1:
Using your grout removal tool of choice, remove all the offending grout from the tiled area that needs work.
Be sure to remove at least half the tile’s thickness of the grout to ensure the new grout can adhere and cure properly.
Step 2:
Using a vacuum cleaner or broom, sweep away all the old grout dust and debris from your grout lines.
I recommend a vacuum cleaner as it will fully suck up all debris and ensure a totally clean area for you to apply the new grout.
Step 3:
Mix your grout!
Or if you are using a premixed grout you can skip this step and simply pop open the lid.
Mix the grout following the manufacturer’s guidelines with a trowel.
Slowly add more clean water until the grout is soft and creamy and like the word entails, it should hold its form like freshly whipped cream.
If it is too soft, simply add more grout powder until the desired consistency is attained.
Step 4:
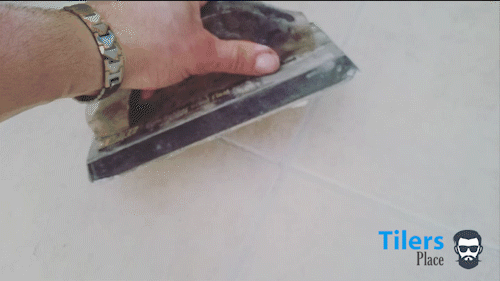
Using your grout float begin to push the grout into your grout lines.
Be sure to run your float over the grout lines a few times to ensure it is evenly compressed and fully covering the grout lines.
Do small sections at a time and keep running over any excess grout with the long edge of your float to help with clean up later.
Cover all your grout lines with the new grout.
If you are doing a large area it is wise to do a few tiles at a time and then washing it off before continuing.
Step 5:
Using your sponge, wet it thoroughly in your water bucket and rinse it out till it’s damp.
Then using the large flat side, run it over the tiles and grout lines gently.
Your first wipe should be only to take off the excess grout and clean the tiles.
Rinse your sponge in the water bucket and rinse again.
This time you are aiming to smooth out your grout lines and removing any of the excess grout.
You should be able to get them clean by repeating this process a few times.
Be careful you do not overwash them as this will result in grout discolouration or it failing to cure.
Step 6:
Wait for a light haze to appear on the tiles then using an old rag or clothing, wipe off the grout haze and smooth out any grout lines.
Be careful not to run the cloth too hard over the new grout as it may leave imprints.
If you do this simply smooth it out with your finger.
You’re done!
You have now successfully repaired your grout and have learned a new skill. Congratulations!
If you are unsure of a few things then please continue reading as I go into greater detail into how to repair your grout.
How To Repair Grout – In-Depth Guide
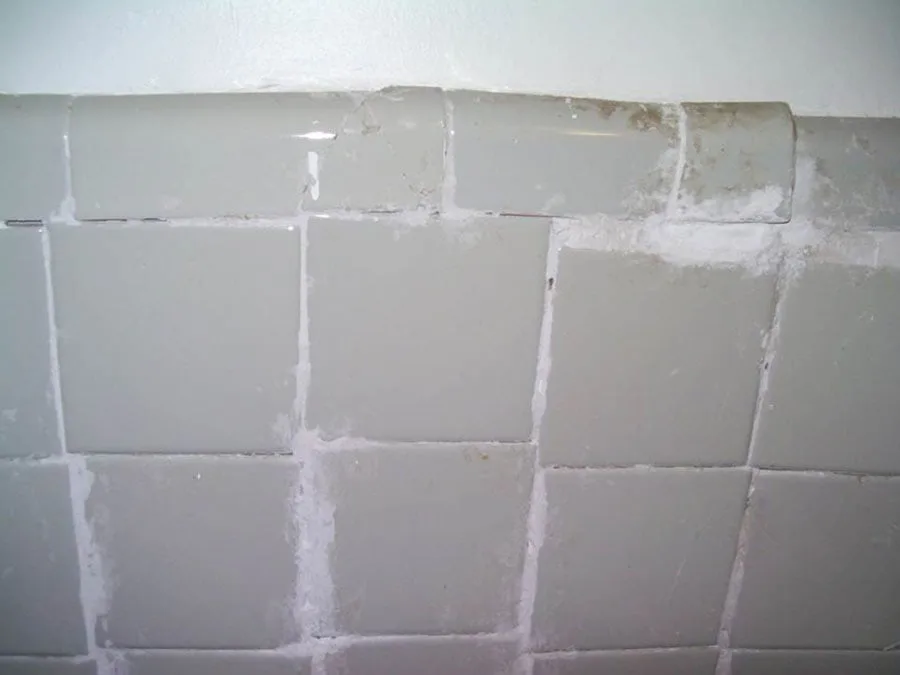
Grout repair can seem like a nightmare to some and you may even have had bad experiences with grout in the past.
Whether it was a result of bad information learned from the web (I have seen many so-called experts or “DIY Kings” spew absolute garbage about grout or tiles in general) or you simply attempted the job in good faith but missed a crucial step that resulted in an undesired result.
Whatever it may be I want to help you understand that grout and repairing grout isn’t as difficult or tricky to do as it will appear.
This grout repair guide will tell you all the things a professional tiler like me does on a daily basis and how I achieve a result that clients will pay me for.
If I give them a bad result I either won’t get paid or wind up sued.
So obviously it’s in my best interests to provide a finish that is up to industry standard and more importantly the client will love.
A finish like this will be career suicide and no do not worry, that wasn’t my work.
The mere fact that someone actually laid such a monstrosity and then grouted it makes my professional eye bleed.
I am sure the surface you will be regrouting does not look like this, not even close.
If it does, would it be rude of me to suggest a complete tear out and start over?
How To Repair Grout
Before we begin, remember to put on your rubber gloves and a good pair of knee pads.
If you haven’t already done so, check out my recommended tools list to see all the products I personally use and recommend for your grout repair job.
With your safety gear on also remember to that any animals and small children should be kept away from the working area.
Step 1 – Prepare your surface
The surface preparation is by far the most important step of a successful grout repair project.
Just like painting, how much work you put into preparation will govern how well your finished result looks.
Thankfully, grout does not require as much time and effort as paint does.
The idea behind preparing your surface for new grout is all about preventing any contaminants getting into and mixing with your freshly made grout.
These contaminants will either hinder the grouts ability to cure which could result in it flaking with time or if you are using a light colored grout; discolouring it.
This is a big concern if you are mixing white grout for obvious reasons, you do not want smudges of brown or yellow in your pristine white grout.
To avoid this you first want to wash you the tiles in which you will be replacing your grout.
If they are dirty or oily I would recommend you give them a good wash with a mop or ideally a steam mop. A steam mop will help release any grease and dirt from your tiles and leave a nice damp surface which will quickly dry.
A normal mop will leave more moisture which will require hand drying with a towel before we proceed to the next step.
If you want a good steam mop that will do the job and is very cheap, you can pick this one up for under $50.
Now that we have our tiles clean we can start the fun part, removing grout!
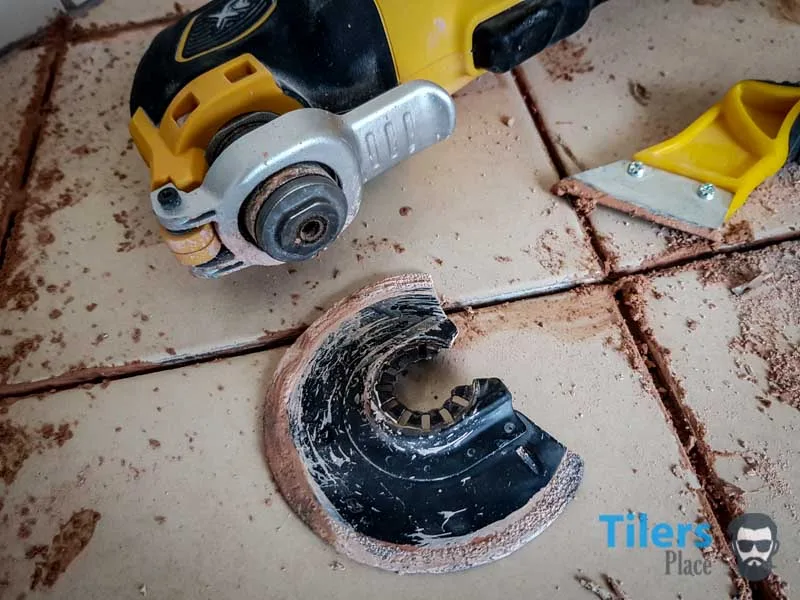
Step 2 – Removing Grout
This part is just as important as preparing your tiled surface as it makes room for the new grout.
Pick up your grout removal tool of choice and get to work.
If you want tips on how to use your tool for removing grout you can read my tips in this article.
You can use a grout saw for small tasks or an oscillating multi-tool with a grout removing blade attached for large or complex jobs to save you a lot of time and effort.
The idea of removing grout for a regrouting job is to free up enough space in the grout line to ensure the new grout can cure and harden properly.
For this to happen you need a minimal thickness of new grout to fit inside your grout line. Grout requires a minimum thickness for it to set properly so it’s important you remove enough old grout.
The general rule of thumb is to remove half the thickness of the tile of the old grout.
I prefer to go as deep as I can just so I am confident the new grout sets properly, of course I am bound by professional guarantees so it’s just for my piece of mind.
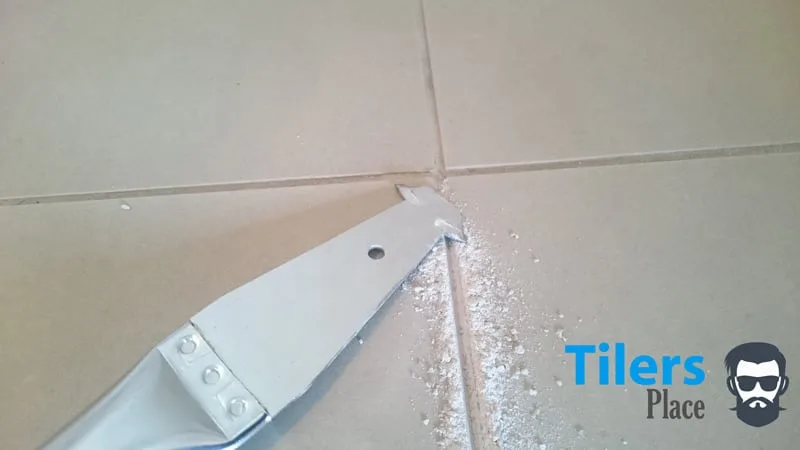
Another thing to remember is to remove all the grout from the edges of the tile, start from the center of the grout line and eventually remove the bits sticking to the edges.
This is important as you do not want old chunks of grout sticking out amongst your new grout. This is especially visible when going with a new colored grout entirely.
Take your grout removal tool and work on small sections at a time. Always start from the center of the grout line and work on a couple inches at a time.
Whittle down the grout with multiple strokes of whichever grout removal tool you are using and move on only when you have removed enough grout and all the edges are clean.
I find a small brush and dustpan are handy to clean up old grout debris as I go, this will reveal any sections I have skipped and ensures I won’t need to go over a section again.
Just take your time and work slowly, take care not to hit the edges of the tile too hard with your grout removal tools as you might chip the glaze of the tile.
Sometimes are very fragile in this regard and the last thing you want to do is damage them.
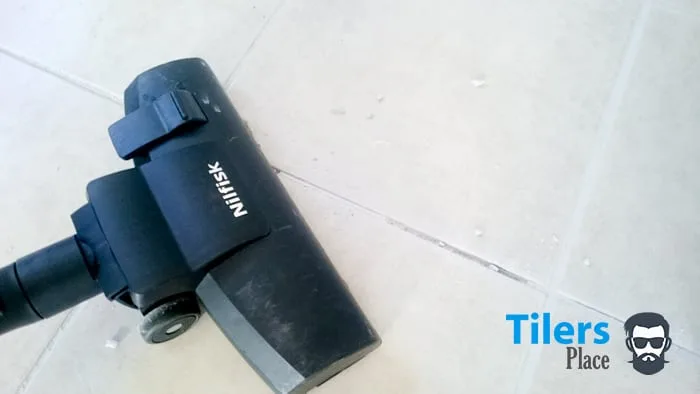
Once you have removed all the grout, fire up your vacuum cleaner and suck up all the old grout debris.
I like to remove the head so I just have the round pipe and stick it directly over the grout line, this ensures I have fully clean grout lines and ready for new grout.
Step 3 – Mix Your Grout
With your surface prepped it is now time to mix the new grout.
If you are used a ready to use premixed grout all you need to do is pop the lid and it should be ready to use.
Read the instructions on the bucket to be sure.
To ensure a proper mix and distribution of the internal components, mixing grout with a spiral mixer and a cordless electric drill is a great idea.
It will ensure the polymers and coloring agents are mixed thoroughly and you will get a consistant batch of grout.
This means you will not get patchy grout!
If this is the case, stir the grout like you would stir the mix for a cake or the like. Go around the edges and make sure you mix all the way to the bottom.
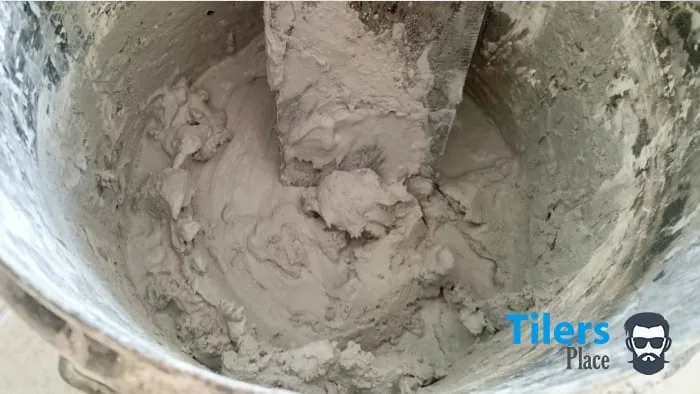
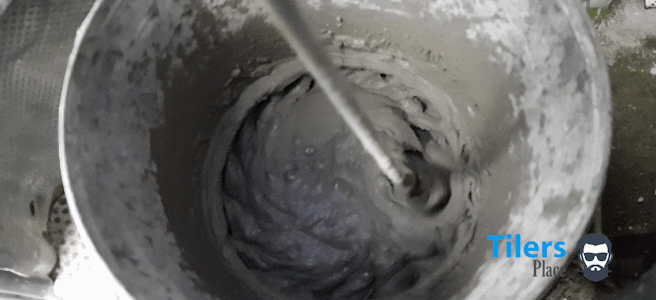
If you are using a dry powder grout like I always use then this is what to do.
Grab your clean bucket that you will be using for washing up and fill it with clean, cool water. Don’t use any old water from a gutter as it will have contaminants that will discolor your grout.
With your water bucket at the ready, pour a tiny amount into the bucket or container you will be using to hold your bucket.
The instructions on the grout packet should tell you the mixing ratio of water to grout powder and you can follow this if you wish.
I prefer to just add water until I have reached the desired consistency.
Remember that water goes a long way when mixing grout, it’s better to add water than having to waste grout powder to thicken the mix.
Add some powder to your water and mix it with either your trowel or the spiral mixer. The spiral mixer is great as it speeds up the process and ensures you get a proper mix. If you’re only making a small amount then just use the trowel.
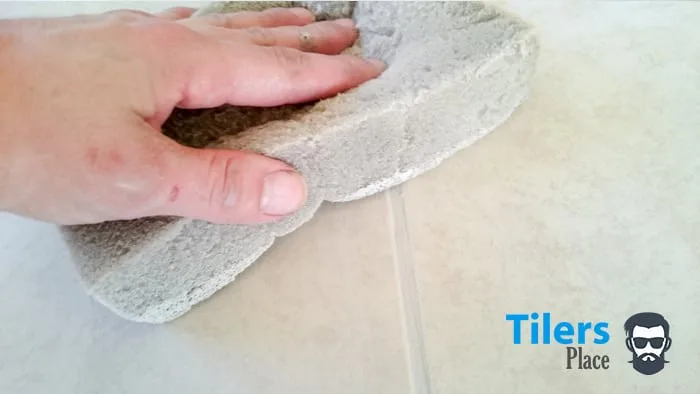
The ideal consistency of grout is one that clumps together but is still pliable with your fingers. If it feels to solid it will make grouting very hard and might affect the performance.
The same goes if your grout is too fluid and wet, it will end up washing out and not curing properly.
If you have either of these things simple add grout powder or water to reach the desired consistency.
The photo above shows you a good grout consistency.
Step 4 – Grouting your Tile(s)
Now its time for the fun bit!
Slip on your gloves and knee pads if you haven’t done so already and get ready for work.
Put your grout and water bucket near you and using your trowel drop a small amount of grout onto the surface you’ll be grouting.
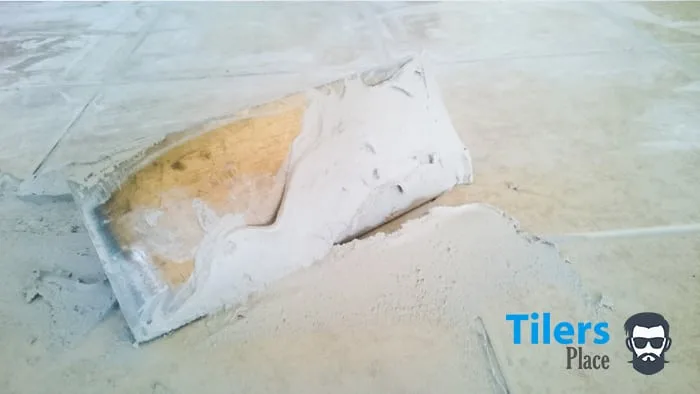
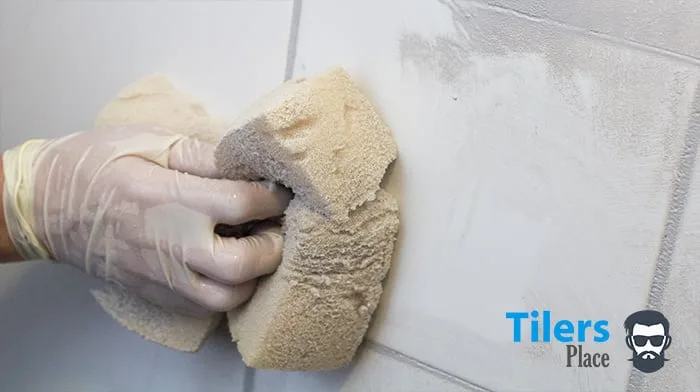
Wall Grouting Tip
If your grouting a wall then slip some grout onto the grout float first. Use the slim top edge of it and scoop some grout from the edge of the container.
Push it against the container’s edge so it sticks to your float.
Just like removing grout from tile, start working on small sections at a time so you can easily manage the work.
Get some grout onto the top edge of your grout float and proceed to push the grout into the grout line.
You need to make sure you push the grout into the gap securely and really compact it in there.
What I like to do is firstly push the grout in with the top shorter edge of the grout float first. I work the grout in and press it 2 or 3 times with the edge.
I then turn the grout float onto it’s long edge and using the flat edge like a squeegee, I wipe the excess grout off.
This motion also helps smoothen and compress the grout into the gap some more.
With the excess grout now on my grout float I wipe it off on the next section of tile that needs to be grouted and repeat the process: I use the shorter edge to push the grout in, compress it in and wipe it off with the long edge.
Be sure to wipe off as much excess grout from the tile as you can, this will help the washing up process immensely.
Also this avoids clumps of grout from drying up onto the surface of the tile. Since some tiles are porous and hard to clean, this will save a lot of heartache and pain later on.
When I have a few tiles grouted or if I notice the grout is drying excessively quickly I stop grouting and begin washing up before I continue on grouting.
This is especially important if working outdoors on a sunny day as the sun will speed up the grout curing time considerably.
Step 5 – Washing off the grout
While it may appear easy, this process is one many people get wrong and it can affect your grouts finish so read closely!
Washing off the grout is a vital step as it will determine the final finish of your grout and it’s quality.
To start off, you need to wet your sponge in your bucket of clean and get it thorough soaked through.
Once it’s fully wet, remove the sponge and delicately wring out the water over your bucket. You can use two hands to gently twist and squeeze the sponge to help speed up the process.
The idea is to remove excess water but still leave your sponge nice and damp so the water will help the cleaning process.
With your sponge ready for action, use the large side and run it over the grouted area.
With the first few wipes, you are aiming to remove as much of the excess grout as you can. When the sponge begins to smear the remains of the grout and cause hazing you want to turn the sponge over and wipe again.
If your tiles are still hazy after these two wipes feel free to rinse your sponge out and start again.
Remember to wring out the sponge!
You should be only cleaning off small sections at a time.
Do not try to clean off everything with just a single sponge wipe.
Work in small sections like you did during grout removal and the grouting itself.
Additionally, during the final cleaning wipes, you can use the sponge to smoothen out your grout lines in case you have any creasing or lumps.
Now here’s the part a lot of people get wrong.
DO NOT OVERWASH THE GROUT!
If you introduce to much water to the grout you run the risk of washing out it’s coloring agents and polymers that help the grout cure.
This will resolve in patchy and crumbling grout after it’s dry.
When I’m afraid I might overwash the grout I prefer to leave some haze and buff it off with a clean cloth after it’s dried.
A final tip would be to remember that once you have your grout lines smooth, try to avoid touching the grout lines.
Use your sponge to only wash the tiles and remove any haze that is remaining.
Once you have washed the grout off your tiles and smoothened the grout lines, you can throw you sponge back into your water bucket and continue grouting.
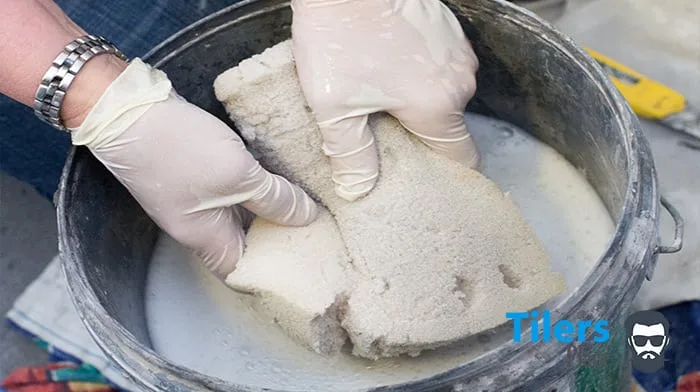
Step 6 – Buffing Your Tiles Clean
You’re nearly there my friend!
Just one more step and you will have successfully repaired your grout or fully grouted your tiles.
This is a step I have actually seen professional tilers skip and it truly throws their professionalism into question as it should never be skipped.
The final part of grouting tiles is to buff the dry grout haze off the tiles and clean up.
Once you have finished washing off the last of your tiles, allow the grout to dry to a haze on the surface of the tile.
While you wait for that to happen, you can spend the time cleaning off your equipment you used to grout.
Throw away the excess grout leftover from your bucket but keep a small amount for any touch-ups you see once you begin buffing.
Everything you used can be washed off easily with clean water.
Keep your gloves on and rub your equipment clean while submerged in a bucket. You can also give them a blast with your hose outside to remove any areas you may have skipped.
Rinse your sponge out a few times to ensure you get the last of the grout out of it or you can simply throw it away if you won’t be doing any more grouting.
With all that done, check back on your tiles.
If you see a fine film of dust-like smears on your tiles that means their ready for their final buffing.
Grab one of your clean cotton cloths and rub/buff the haze off your tiles.
Be gentle around your grout lines as they are still malleable however if you see any creases or imperfections you can smoothen them out with your finger.
How much elbow grease you need to put into it will all depend on the porosity of the tiles, most of the time it will require a gentle amount of effort.
Remember to keep changing the section of your rag or getting a new one once it becomes too wet or powdery from all the grout haze you have cleaned off.
If you have any holes or dips in your grout lines simply add some grout you left over and push it into the gaps, clean it off with your rag and your good to go.
With your tiles shining and glowing with their new grout you are complete!
Keep any children and animals off your fresh grout for at least 12 hours to prevent any damage to your grout.
After that time it should have hardened and ready for traffic.
Congratulations!
Conclusion – How To Repair Grout
No tiled surface should be ruined by crackling or discolored grout as it’s a waste of a beautiful finish and product.
The only option is to repair the grout and finish the tile with a fresh batch of grout to bring it back to it’s former glory.
This complete guide to repairing grout and grouting tile went in-depth and covered all aspects of grouting.
From removing grout from tile all the way to buffing them clean and tips on the best grouting tools need for the job, I feel this guide is one of the most comprehensive grouting guides available free and online for anyone that requires it.
I hope that my grouting guide has proven useful to you and used it as a vital tool to educate yourself on how to repair your grout and even used it to show you how to grout your tiles.
These detailed steps listed are exactly what I do during every grouting project I do so you can rest assured you are grouting properly and up to a professional standard.
Remember to ensure a quality finish you should be using quality products, with this in mind I tracked down the best grouting tools for you to use on your projects.
All the grouting products linked (just click the photos) are the lowest prices I have been able to find to help you save money on your DIY project.
With that I will end this giant guide to repairing your grout, it was a lot of work and effort but I feel it is worth it.
If you want to help support this article and show some appreciation I would love it if you shared this article with your friends and social circles.
Share buttons are on the side and just below this article.
I hope you found this guide useful and have managed to repair your grout and are enjoying your freshly grouted surface!
4 Comments
Carly – December 4, 2017
I’ve been digging around the web for a proper grout tutorial for ages!
You’ll be surprised how many so called “tutorials” from big names in home improvement have the worst instructions ever!
You’re first paragraph was already longer and more detailed than their whole “tutorial!
I followed your instructions to a tee including getting most of the recommended products you suggested, if a pro tiler uses em then they must be good!
My grout came out amazing and thanks to your detailed instructions I had no trouble at all. I can’t thank you enough for taking the time to write this up for us first timers, keep it up Carl! 🙂
Rachael – September 6, 2018
Beautiful guide Carl, it answered so many questions I had about grout! You can’t believe how relieved I am after reading it, I’m fully confident I take repair some troublesome grout I have in my kitchen and washroom. I truly appreciate the time you put into creating this to help us out, thank so much! <3
Carl Anders – September 9, 2018
Rachael, you have just made my day.
I highly appreciate your comment and getting back to me to let me know my guide has helped you in some way! I’m pleased my grout repair guide has answered a lot of your questions and filled you with confidence to undertake the task, if you have any further questions, please let me know!
Thom – October 2, 2018
Thnx for all the help with my grout removing project. I have a quick question though, in some parts of the tiles, I removed all the grout and there’s patches of darkness where I can see the surface below the tile. Did I go to deep? Is this okay or did I mess up? Kinda worried i did something wrong, it’s my first time doing this stuff!
Any help would be appreciated.
Carl Anders – November 6, 2018
Hi Thom,
There’s nothing to worry about! It just means that you have removed all the grout from the gap and have a fully clean slate for your new grout to adhere to. Having patches where some grout is fully removed and some not is just a natural occurrence with grout removal. As long as you have at least half the thickness of grout removed, you should be fine to regrout on top.
All the best with the grout repair!
John Blanning – September 7, 2021
One thing I’m not sure about is how ‘high’ i.e. close to the surface the grout should be. In the photographs, the grout looks quite low (a mm or 2 below the tile surface) – isn’t this a problem when water gets on the floor, i.e. it will ‘sit’ in the grout lines?
Carl Anders – September 8, 2021
Hi John,
This is natural as it’s impossible to get grout perfectly flush with the tile. When grout is applied it is flush, but when you sponge it to form a uniform finish, some depth is always lost. A few mm is acceptable. You can usually tell visually when too much grout has been removed and needs touching up.
Whatever water sits on the grout will either evaporate or sink into the grout naturally. In the case of epoxy grout, it’ll only evaporate as epoxy doesn’t allow water penetration.
Hope that helps.

Leave a Comment
Your email address will not be published. Required fields are marked *
Comments are currently closed for new submissions.