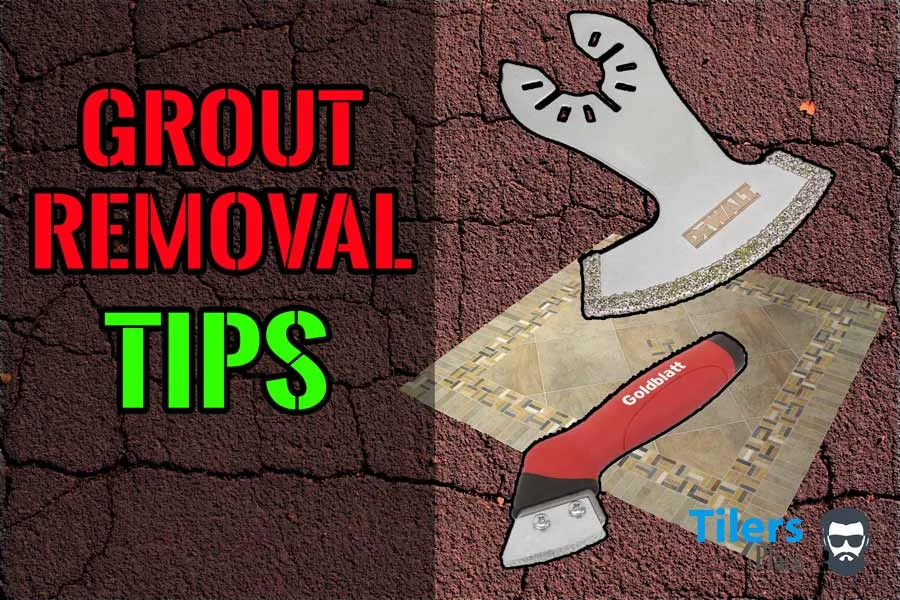
Removing grout from ceramic tile, it is not as hard as you may think!
With the right tools and advice you will get rid of that pesky grout and restore your tiles beautiful finish!
Whether you are looking to remove grout haze from tile or needing to remove the grout itself, this complete guide is all you need.

Hi there fellow homeowner and welcome to my guide to removing grout from ceramic tile.
For the past 25 years, I have been tiling professionally and I have been removing grout from ceramic tile for all that time
Over this vast period of time, I have discovered what works the best in removing grout in all sorts of tiles and I want to pass that information on to you.
Having your tiled surface ruined from grout is a big waste of your expensive investment and I want to help you correct it.
All these tips and products I mention in this grout removal guide do not a professional’s help.
Just follow the tips, invest a few dollars in the products recommended and you’ll be removing grout in your ceramic tiles in no time!
*Please note! This guide can be used for other sorts of tiles as well, including Porcelain tile.*
What the Guide to Removing Grout From Ceramic Tile Contains:
-
Information about grout
-
Guide on how to remove grout haze
-
Guide on how to remove grout
-
Advice on the best grout removal tools and products to remove grout haze.
-
Links to the lowest prices on all products mentioned in this article
Are you ready to remove grout from ceramic tile? Let’s go!
What is Grout?
To get a better understanding of removing grout from tile, we should first understand what grout is.
Grout is used to fill in the cracks between tiles and help add strength to the entire tiled surface.
It bonds the tiles together and helps aid the thinset (tile glue) in keeping the tiles stuck to the surface.
Grout also helps keep dirt and debris out from tile cracks and adds a basic form of flexibility to the solid surface.
Grout, at it’s simplest form is a fluid form of concrete.
It usually comes in a dry powder and with the application of water, it turns into a paste that can be pushed and formed in between tiles.
Even in the roaring 90’s the most common grout was indeed just concrete and silica sand.
I didn’t go to tile stores and purchased a bag of grout, instead, I went to landscaping supply stores and purchased bags of concrete, sand and mixed my grouts myself.
If you wanted color grout, I would purchase a packet of colored oxide used for making colored concretes and mix it in before grouting.
It was all very primitive however since it was basically concrete, the grout was extremely strong.
And hard to remove.
There was a simple white grout that was the first primitive form of the grouts we have today.
It was only used on walls as it was no way near strong and durable enough to withstand the rigors of foot traffic.
What few floors were grouted with white grout were very quickly torn out with grout saws and replaced with grey grout.
They either cracked early on or became so heavily stained, the owner had no other choice.
As technology advanced we started seeing polymers and latexes added to make the grout we know today.
Today, such things as color fastness, mould resistance and flexibility come in the pack.
They are all inherent in grouts and it’s made for a very durable product.
Now we have all sorts of grouts from sanded and unsanded to epoxy grout.
Sanded grout is the more advanced version of the original concrete and sand mix with additional polymers added.
It is still very strong and stain resistant (to a degree) but comes at the cost of being very gritty.
You do not grout walls with sanded for instance, as the finish is like sandpaper and extremely displeasing to the eye.
Unsanded grout is the dominant grout in the industry today and chances are you will have it in your own home.
Whether it is on the floors or walls, it offers a very smooth and pleasing effect with the additional benefit of being flexible.
It can withstand the natural movement and flexing of the structure without cracking to a degree.
Obviously, these tolerances can be exceeded and the grout can crack, this is usually caused by poor preparation of the substrate or the wrong class of thinset used for the job.
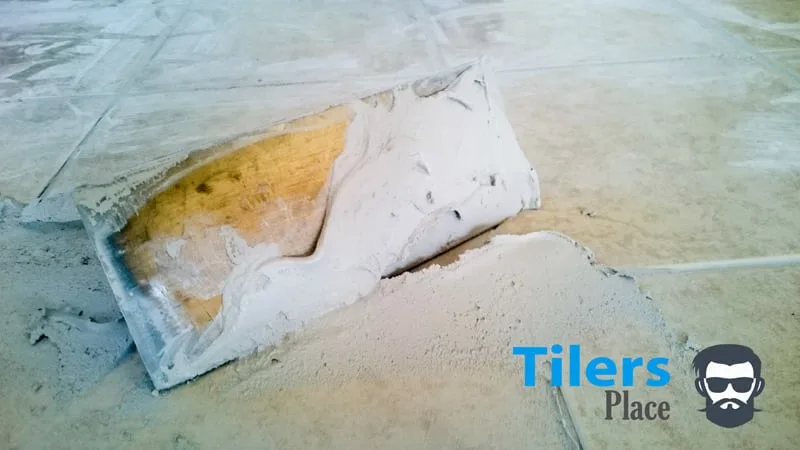
This image is from a job where the tiles were laid over a soft wooden floor.
To tile over a wooden floor especially in an old building, one would need to install cement board over the floor first.
Then using a quality flexible thinset to ensure the surface tolerates the flexing of the floor beneath.
A visual inspection of the joists beneath the floor and even adding more would have prevented this grout cracking.
In a situation like this, removing all the grout from the ceramic tile would be the best option.
Unfortunately in most cases, if the grout is so severly cracked like this, removal of some tiles or a full redo of the job would be required.
Otherwise, it would happen again if you removed the grout and regrouted the area again.
Back to the matter of grout itself.
In terms of entirely removing grout from ceramic tile, if you indeed have unsanded grout you will find the task a whole lot easier.
Unsanded grout is easier to penetrate with standard grout removal tools and clumps up more during removal.
Sanded grout is a whole lot more stubborn and comes out as single grains, making your task a whole lot harder.
In terms of grout haze, both sorts of grout, whether they are unsanded or sanded, can cause hazing to stick to the tile.
In my experience grout haze is mostly caused by failure to wash off the grout properly during grouting.
Whether that be during the washing up stage with water and a sponge or after the haze has flashed off and removed with a dry cloth.
Every tile job I have completed always required thorough cleaning with a cloth after the grout and the haze on the tiles has dried.
If not done the grout haze can solidify on the surface and create the hazing you may be trying to remove right now.
On rare occasions, I find that even the most thorough cleaning can’t remove grout haze off a tile.
This is usually caused by a very gritty or porous tile that absorbs the grout into it’s surface.
In those situations, I turn to specialist cleaning products and it’s these products I recommend you use today.
Now that we have a basic understanding of grout, let’s learn how to remove grout from ceramic tile first.
After that we will touch on how to remove grout haze from ceramic tile.
How To Remove Grout From Ceramic Tile
This part will be how to remove the grout itself from in between your tiles.
Remove Grout From Ceramic and Porcelain Tile
Removing grout from tile is something that is very easy to do with the right tools and knowledge.
If anything, it is a time-consuming process as you can imagine, especially if you are looking to regrout a bathroom floor for example.
The more grout you have to remove the longer it will take.
But as wise people always say “good things take time!”
If you spend the weekend regrouting your home, your efforts will be appreciated and felt for many years to come.
5-10 years and even more down the line, you will be enjoying strong and clean grout if you take time to remove the old grout.
Of course you may be looking to only remove a few grout lines for a tile replacement for example.
In that case, it shouldn’t take more than half an hour or less if you use the right tools.
I wrote up a comprehensive guide on the best grout removal tools.
It will point you to the best grout removal tools for any size job and budget.
I dug deep around the internet and found links to the best prices on all tools listed as well.
I want to save you the time digging around yourself and give you the answers all in one place!

Removing Grout From Ceramic Tile
Tip 1 – The Right Mind Set
The main thing to remember with grout removal from ceramic tile is that patience is a virtue.
I believe the right mindset is required for any job and by reading this guide I will help prepare yours for the task.
Grout removal takes time and the best results require you to take your time and not rush it!
Rushing it can resort in your damaging your tile either by chipping or scratching it or by cutting into the substrate beneath.
If you have heated floors or waterproofing underneath the tile, this is something you really need to keep in mind.
Did I scare you?
Don’t worry, all the tools I list here and the best grout removal tools won’t cut deep enough to cut through those things.
So exhale, you got this.
Before you start your grout removal job, simply remember to take your time, take it slow and work methodically.
If you are searching online for grout removal tips that means you are a handy person and a DIY-er at heart.
You have undoubtedly done other renovation tasks in the past, so this new skill of removing grout from ceramic tile should come naturally.
I do grout removal from tiles on a weekly basis and for every job I set my mind to patience and calm.
If I even slightly chipped or damaged a tile I am in big financial trouble.
Most people do not have spare tiles lying around for me to simply replace the one I damaged so that chipped tile opens me up to their mercy.
I know fellow tilers who had to retile a whole floor simply because they chipped a tile during grout removal.
A simple grout removal job turned into a $5000 dollar expense on their behalf.
They had to cover the demolition, tile supply and install all from their own pocket.
Yikes!
Thankfully, I have never damaged a tile in my career (knock wood) so have evaded such trouble.
So remember, use the right tools, take it slow and you will succed!
Removing Grout From Ceramic Tile
Tip 2 – The Best Grout Removal Tools
This is the fun part!
I love talking about the best grout removal tools for tile as I developed a certain level of affection for the tools that never let me down.
When you are a professional in any industry, you are nothing without the proper tools for the job.
We wouldn’t get through one day without the right tools for the job and grout removal tools are no exception.
Over the 25 years of working with tile and grout I have whittled down the massive range of grout removal tools to a select few that are the best!
Jump at Amazon or Home Depot and you’ll be swept away by the hundreds of grout removal tools.
Sadly a lot of them are targeted at people that do not know what to look for and these people end up buying grout removal tools that do not work!
I want to put a stop to this and show anyone that cares to learn the best grout removal tools so you know which ones to buy.
First off we will start with the power grout removal tools.
They are the best grout removal tools and ensure the quickest result.
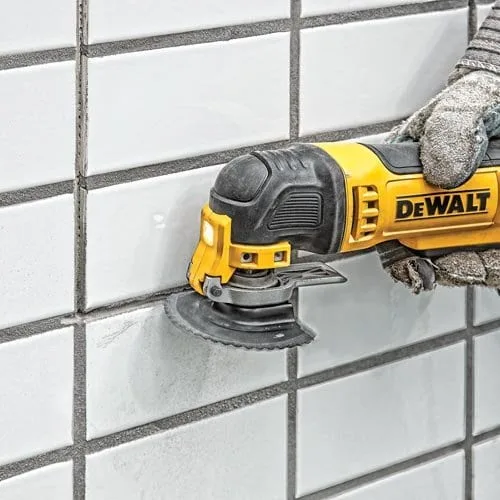
The Best Powered Grout Removal Tools
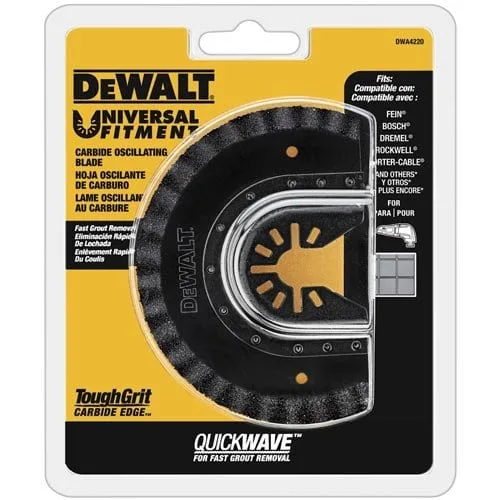
If you want the best grout removal tool then it is the DEWALT DCS355D1 Multi Tool.
Coupled with the DeWalt Grout Removal Blade you will make short work and remove grout from ceramic tile in no time.

Of course, I understand you may have invested in other companies and have their batteries to suit those tools.
The good part is that most multi-purpose tools are similar so you can buy your favorite brand of oscillating multi-tool and still have the best grout remover to remove grout from ceramic tile.
Simply purchase the multi-tool you have batteries for and a grout removal blade.

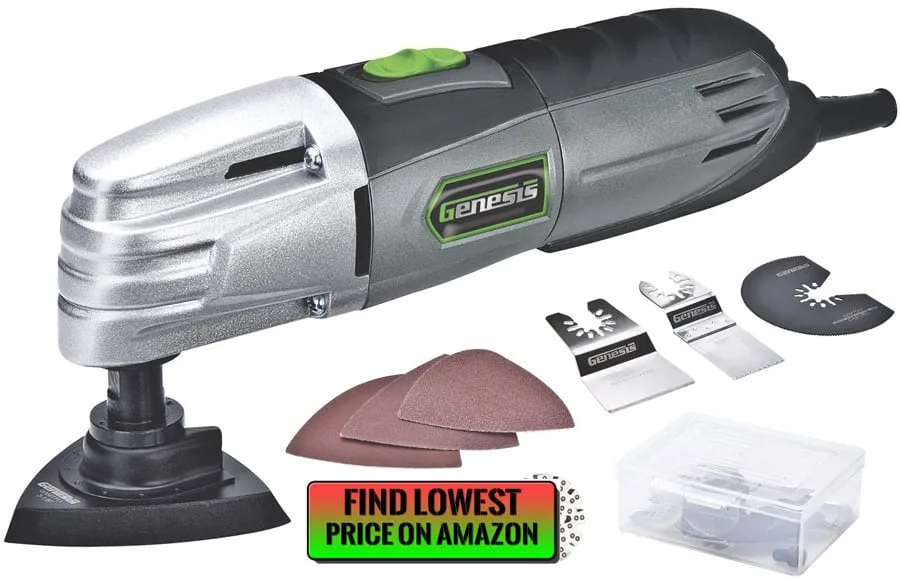
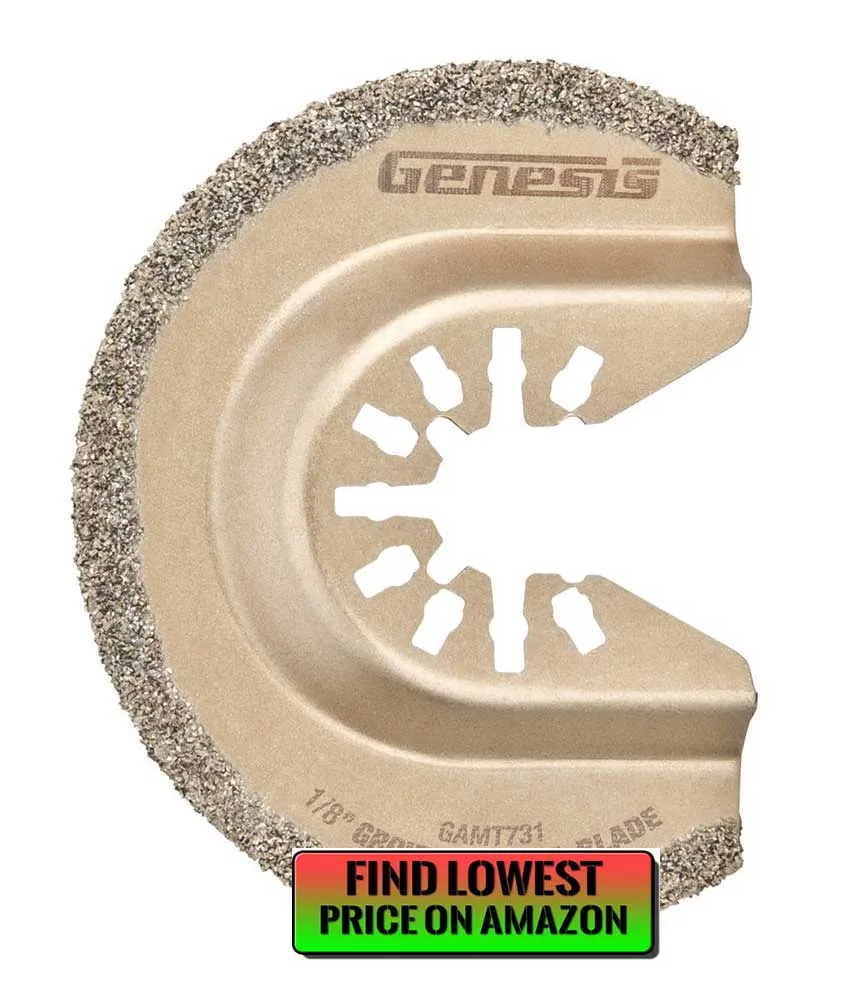
Want the best low price grout removal tool?
The Genesis Multi Tool with its grout removal blade works very well for the removal of grout from ceramic tile.
At a price that any homeowner can afford with a quality design and ease of use, it should be your first choice.
Click the images below to find the affordable grout removal tool along with the grout removal blade.
Remember you will require BOTH to ensure it removes grout from ceramic tile.
These are your best options for removing grout from ceramic tile.
Simply choose a multi-tool that fits your budget and buy the grout removal blade that attaches to it.
It couldn’t be simpler.
If you are unsure, purchase the Genesis Multi-Tool with the grout removal blade I have linked above.
Simply fit the grout removal blade, plug it in and go!
Of course, there are also hand grout removal tools that you can use to remove grout from ceramic tile.
They do not work as efficiently or as quick as powered grout removal tools but they have the advantage of reaching tricky areas.
If you want my professional advice, purchase both a powered grout removal tool and a hand grout removal tool.
That way you have the best setup for removing grout and can access all areas you need to remove grout in.
The Best Hand Grout Removal Tools
Hand grout removal tools are a great inexpensive way to remove patches of old grout with relative ease.
They are usually strengthened with either diamond or carbide which make them tough enough to cut through grout.
Advancements in grout removal hand tools haven’t really been made since the invention of the grout saw so you will see a lot of rehashed designs of the same thing.
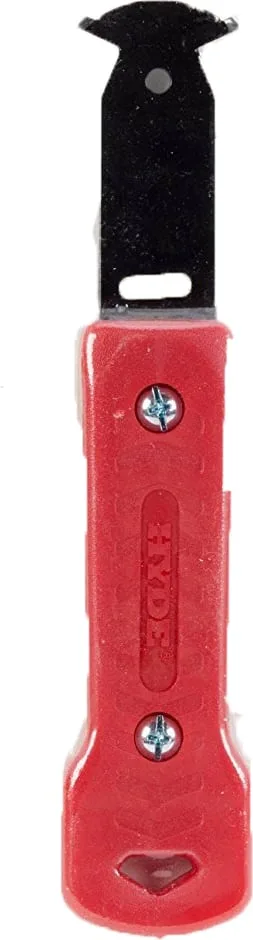
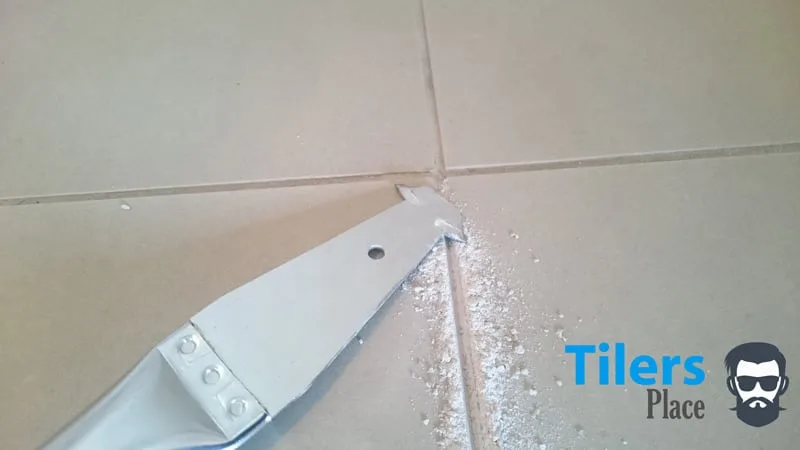
However, these is one grout removal tool that is simply lightning fast in removing grout from ceramic tile.
Check out the animated image below to see what I mean.

Are you impressed?
You bet I was!
With a single stroke or two you can remove an entire line of grout and be ready for regrouting.
Keep in mind that this grout removal tool works the best on unsanded grouts due to their composition, a tough old sanded grout will require a bit more effort!
This miracle of grout removing technology is a Carbide Cutter.
If you have unsanded grout, this will remove grout from ceramic tile a snap.
It has dual cutting edges that are strengthened with carbide and can easily penetrate the grout.
With a comfortable hand you simply pull along the grout line and it does the rest of the job.
I highly recommend you purchase this tool alongside your powered grout removal tool.
You can use this tool in all the tight joints near a wall and anywhere else that the powered grout removal tool can’t reach.
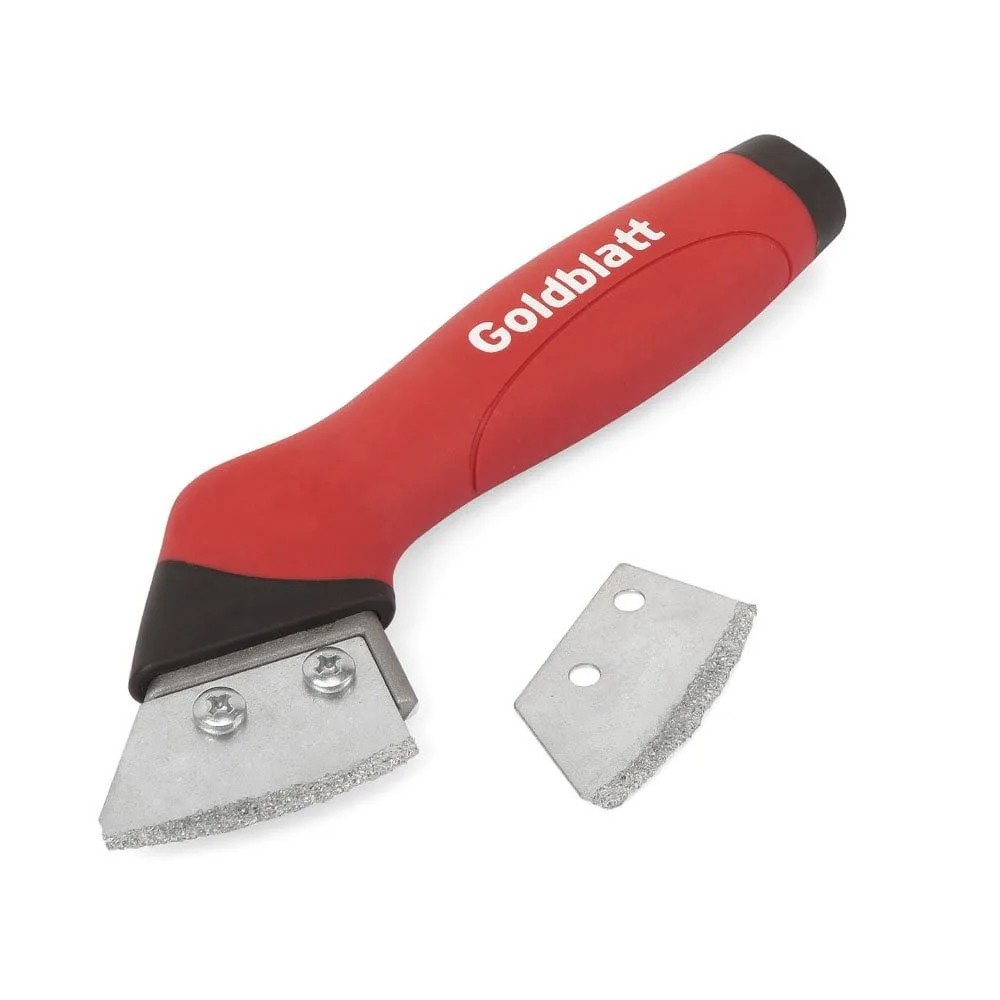
Another great hand tool to remove grout from ceramic tile is a Grout Saw.
This one from Goldblatt is very affordable and comes with a large grip making use very comfortable for all hand types.
A grout saw has a blade very much like the one you will find on a grout removing multi tool.
It is encrusted with industrial diamonds and turns grout into dust as it runs across it.
WIth a grout saw you use it as the name emplies.
Starting from the center of the grout line you saw up and down repeatedly until you get to about half the thickness of the tile removed.
That is enough for your new grout to cure properly in the new grout line gap.
Using a grout saw to remove grout from ceramic tile is the most basic and cheapest way to remove grout.
In saying that it is also the slowest and most labour intensive method of removing grout.
There’s a reason why the grout removal saw is so cheap as your elbow grease and time make up the price difference between a professional grout removal tool.
If you have the time and patience then you will achieve perfectly serviceable results with a grout saw.
Here is an image of grout removal in a bathroom floor I completed recently.
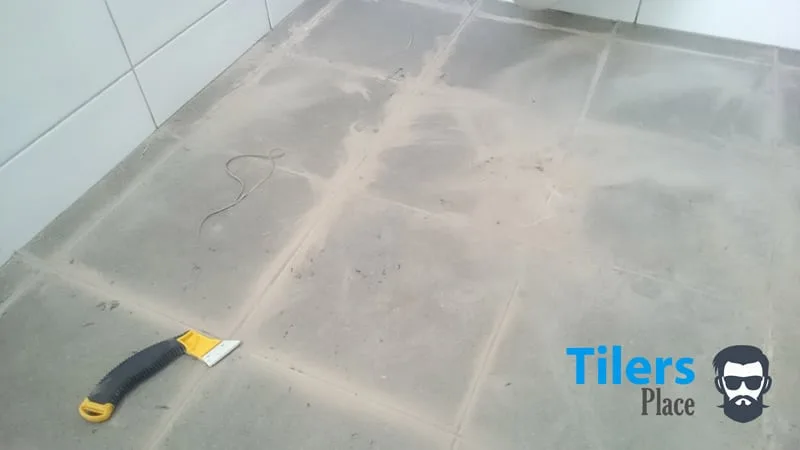
As you can see the old grout has been ground to dust by the grout saw.
I also cut out the old silicone with a craft knife and will be applying new silicone in the wall and floor joint.
All that’s left is to brush out the dust and regrout!
So as you can see a grout saw works to remove grout from ceramic tile and is very cost effective.
Just don’t forget to factor in how much is your time worth!
It might end up being cheaper to buy a powered grout removal tool and saving yourself hours.
The Best Grout Removal Tools Wrap Up
I hope this section has taught you about the best grout removal tools that a professional tiler would use.
After visiting the links you should have an understanding of how much the tools cost and which ones will apply to your budget.
If you want to know what I personally would use then I will post a recommended shopping list below this section for you.
These tools will be your foolproof grout removal tools and make short work of any grout you have to remove.
Of course all tools linked are great so feel free to pick and choose whichever you prefer.
The Best Grout Removal Tools – Shopping List
↓↓Click the photos to find the best prices on the web↓↓
REMOVING GROUT FROM CERAMIC TILE
TIP 3 – Removing grout
Now that you have the best grout removal tools to remove grout from ceramic tile let’s find out how to use them!
First up let’s talk about your powered grout remover, the multi-tool with a grout removal bit.
Tip 1:
I know you don’t want to hear it but my first tip would require another tool to buy.
While the grout removal blades I talked about are great they do have their limitations.
The primary being they can’t reach all areas required and the second being they do wear out eventually.
If you have a large job you may use up a blade which will slow down progress significantly.
Here is a great selection of grout removal blades including one that will cut right up against the wall.
You will get more than enough to complete a project and they come in a number of designs to fit into any area.
They are also designed to be universal fitment on most oscillating multi-tools.
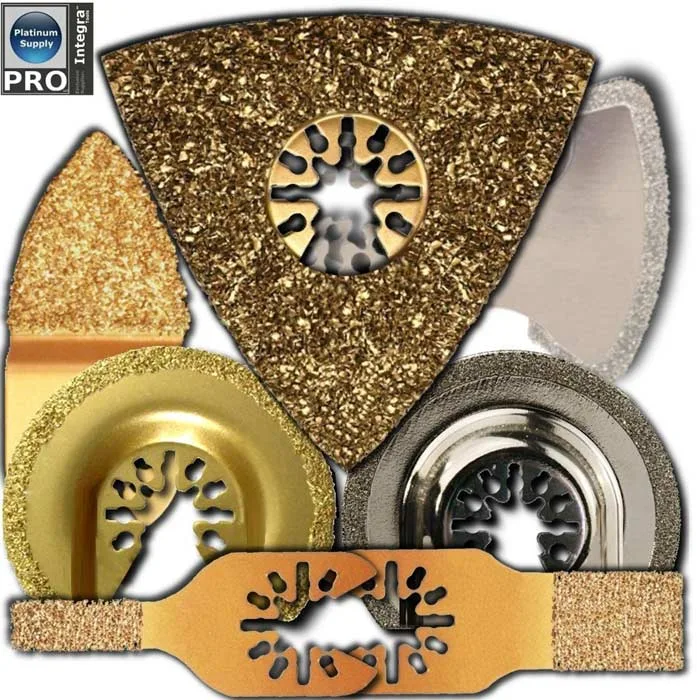
Grab this selection of grout removal blades here 🙂
This pack also contains my favorite attachment when I am replacing tile.
The triangular attachment with the diamonds facing down is amazing at cleaning away old thinset and glue after I tear up a tile.
I just buzz it away without creating a mess and it saves me from chiselling away the old thinset as well.
If you own an oscillating multi-tool or a buying one after reading this article, do yourself a favour and pop this into your cart as well.
Okay now that we have our oscillating multi-tool setup to remove grout from ceramic tile let’s begin.
Further Reading: If your thinking of getting one, my oscillating multi-tool buyer’s guide should give you all the information to make an informed decision on which one to buy.
**
Tip 2:**
If you are replacing a whole floor then I suggest you begin from the end and work your way out of the room.
This saves you from crawling all over the old grout and dirtying your clothes and sweeping the dust all over the floor in the process.
With the oscillating multi-tool itself you want to power it up first and then press it up against the center of the grout line.
If the trigger is speed sensitive like on a Dewalt DCS355D1 or has a speed switch then leave it on low until your comfortable with the power tool.
Press it on one point of the tile and let it do the work.
You do not want to push down or force it as this will burn out your blade much faster and won’t really increase it’s speed anyway.
Once it’s made good headway into the point you can pull it down and let it begin on a new section.
Eventually, you will have about half the thickness of the tile removed of old grout.
This is plenty for replacing grout but if you are replacing the tile entirely I recommend you remove all of it.
The process to remove all the grout is similar as before just keep grinding away untill you reach the bottom of the tile.
You will easily tell once you hit the bottom at the resistance will lessen and you will be able to see the thinset/mortar underneath.
The chances of you grinding past the grout, thinset and into the substrate beneath are very slim.
Your common sense will prevent anything of the sort as well.
Tip 3:
If you will be using your powered grout remover near a wall with one of the specialist blades I mentioned, this tip might be useful.
To prevent you scratching the vertical wall tile with the blade you can place masking tape on the wall tile.
Just a small strip to stop the blade incase you slip shall be enough.
There are some wall tiles that are susceptible to marking, especially white matte tiles (oh how I dislike them) and can get a burr line from your grout removal tool.
With the tape in place near every grout line you will be replacing you should be safe.
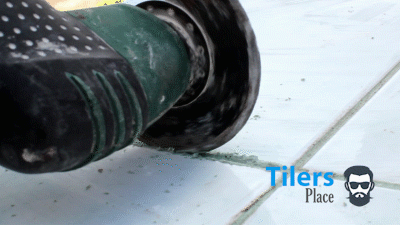
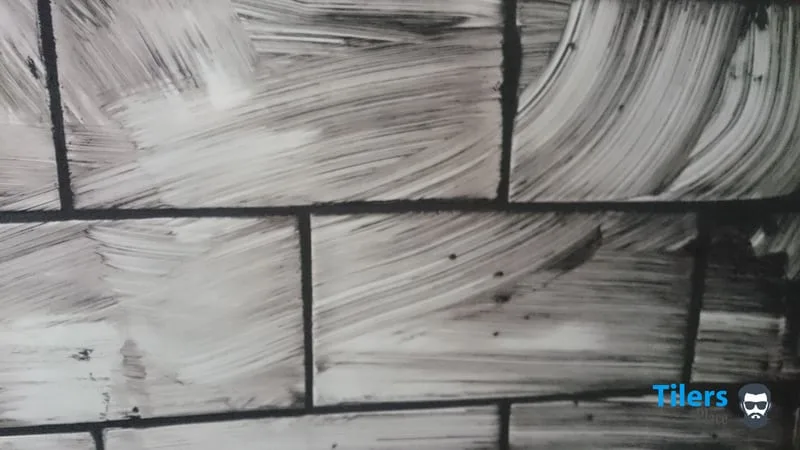
This animated photo shows a multi-tool with grout removal bit in action.
As you can see I am working back as the grout gets removed and that’s really all there is to it.
Just keep in mind my tips and maintain that patient mindset.
If you do those things, you will remove grout from your ceramic tile with a powered grout remover without any problems at all.
REMOVING GROUT FROM CERAMIC TILE
TIP 3.5 – Removing grout Pt.2 – Hand Grout Removers
While their simple nature makes their use self-explanatory can throw in a few tips for you.
Tip 1:
The biggest tip would honestly be to invest in some good knee pads as you will be kneeling a lot during this process.
I have written numerous articles about knee pads for a variety of trades and even wrote a Top 10 Best Knee Pads for Work Review where I discuss the very best knee pads.
You can find the whole list here if you want pointers in which to get.
For brevity, I can recommend you these NoCry Professional Knee Pads.
They will keep your knees protected while you remove grout from ceramic tile and keep you away from any nasty substances.

Tip 2:
With your knee pads on you can begin removing grout from your tiles.
With a grout saw simply begin in the middle of the tile and begin sawing with an up and down motion.
Once you have gotten through the initial crust add more pressure and keep going.
I find removing about 6 inches at a time to be best.
Saw up and down along that track until you have removed the required amount for your job.
Remember:
Half the tile thickness for grout removal.
All the tiles thickness for tile replacement.
Once you have done that track, begin the process again until you have removed all the grout you require.
Tip 3:
Start from the center of the grout line and then angle the grout saw to help remove any grout sticking to the edges of the tile.
This is much easier than starting from the outer edge and working inwards as you get better purchase and remove more grout with every motion.
Tip 4:
This tip is how to use the carbide cutter.
I begin at the top of a grout line, press down hard and rip all the way down the tile.
If your on your knees you can pull down in a fluid motion and simply laugh at the grout getting thrown out as you go.
You can then go over the line again to remove any further grout.
Also be sure to angle the cutter to remove any grout sticking to the sides of the tile during any successive runs.
Be careful with this cutter as it can damage your tile if you are not careful.
It’s best to go slow with a sure hand until you get the hang of using it and getting more comfortable removing grout with the tool.
Unlike a grout saw this cutter works best in one direction due to the shape of it’s blades.
Simply score down towards you, up strokes are very difficult and don’t do much.
HOW TO REMOVE GROUT FROM CERAMIC TILE CONCLUSION
You did it!
Congratulations on reaching the end of this massive chapter and learning how to remove grout from ceramic tile.
Hopefully you now know which grout removal tools to buy and how you should be using them in your grout removal projects.
Grout removal from ceramic tile isn’t as hard as you will find as long as you follow my pointers and use the right tools.
Next up we will discuss how to remove grout haze from ceramic tile.
It will be a much shorter chapter as there isn’t really that much to it however the right products are essential for a great result.
If you got onto regrout your tiles, consider sealing your grout to ensure it lasts longer and is easier to keep clean.
Check out my grout sealing guide if you would like to learn more.
HOW TO REMOVE GROUT HAZE FROM CERAMIC TILE
Grout haze can easily ruin a beautiful tile finish as it covers it with an ugly and dull coating.
As I mentioned previously grout haze is left over grout residue that has dried on and cured to full strength.
Whether the tile surface was poorly cleaned during grouting or the tile itself is of a very porous; the following guide is for you.
In this guide I will be recommending a range of products that I personally use to remove grout haze from ceramic, porcelain and natural stone tile.
I will try cover the most common scenarios and the severity of the hazing, all you need to is find which corresponds to you and get the product recommended.
I won’t be listing any homebrew cleaning tips or wives tales as I know you would have tried them by now and are looking for actual answers.
Since most solutions will have the same usage procedure with only the dwelling times changing, I will give universal instructions that you can modify with the product directions.
If you are worried about grout haze and have not started grouting yet, you can read my grout haze prevention guide.
It will teach you how to avoid grout haze and you will avoid the grout haze clean-up detailed in my guide below.
How To Remove Grout Haze From Tile – Basic Instructions
These instructions will be universal for any grout haze, the only thing that will change will be the product used.
Below the cleaning instructions, you will find a guide on which product to use.
Cleaning grout haze steps:
Step 0 : Put on some gloves, knee pads and long sleeve clothes.
Step 1: Test your grout haze remover in an inconspicuous area before undertaking any work.
If you can remove it with water and it doesn’t affect the tile or grout your good to go.
Step 2: Vacuum clean or sweep the surface needing grout haze removal.
Step 3: Apply your chosen product to the surface of the tile with either an old sponge or cloth for small areas or a broom for large-scale areas.
Depending on the product you may need to dilute the solution with water. All the necessary instructions will be on the bottle.
Step 4: Following the necessary dwelling times on your product’s packaging, let the solution sit on the surface of the tile.
This will allow the solution to bite into the graze haze and do it’s magic.
Step 5: Now comes the fun part, agitate the surface of the tile with a brush. You won’t damage the tile so the more elbow grease you put in, the better the result.
If you are doing a big area, I find a stiff bristled broom to work great.
Step 6: Using a sponge and plenty of fresh water it is time to mop up the dirty solution.
If you are doing this indoors this will require you getting on your knees and washing off the solution by hand.
Keep a large bucket full of fresh water nearby and keep rinsing the sponge out as it gets full of solution.
Depending on the scale of the floor you might require refreshing the bucket with clean water.
If the surface is outdoors you can use a hose to wash off all the residue.
Please be careful to avoid any stormwater drainage, fish ponds and other areas you do not want to be contaminated.
Step 7: Allow to dry and see how the dry surface looks. Reapply to any trouble spots and repeat the process.
That is the basic instructions for grout haze removal on tile.
The essential idea is you scrub the surface with the special solution and rinse it off.
You can also read about grout haze removal on Aqua Mix’s Website.
How To Remove Grout Haze – Choosing Your Product
Which product you choose will depend on how old the grout hazing is and which material the tile is made from.
I will be recommending Aqua Mix Products only because I have been using them for over 15 years without them failing me.
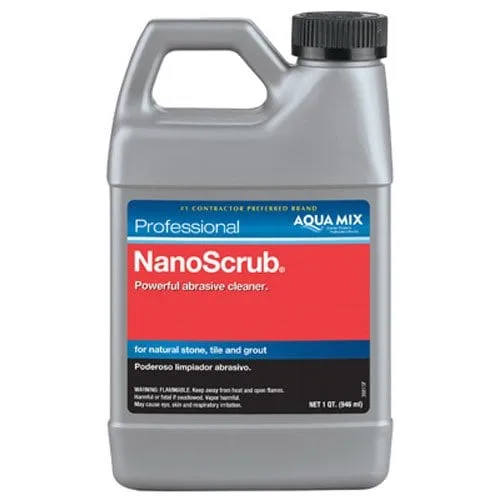
Aqua Mix Nano Scrub – For Heavy Staining/ Safe on All Surfaces
This is a bit of a miracle product as it works very well and best of all it’s safe on all surfaces including natural stone.
Since this is a milky and thick solution you want to prewet the surface first.
Then follow the standard instructions and give the surface a good scrub.
I would be very cautious of letting this dry on the surface so only let it sit for a few minutes at a time.
Aqua Mix Phosphoric Acid Substitute – For lighter grout haze/ Safe on all Acid Resistant Tiles and Stone.
(Porcelain, ceramic, quarry, saltillo, terracotta, natural stone (such as granite and slate).
Before doing any cleaning ensure you use acid resistant gloves made of Nitrile and wear eye protection in case of splashing.
This acid substitute is a bit of an all rounder as it cleans more than just grout haze.
It removes efflorescence, hard water stains, soap scum and lime deposits
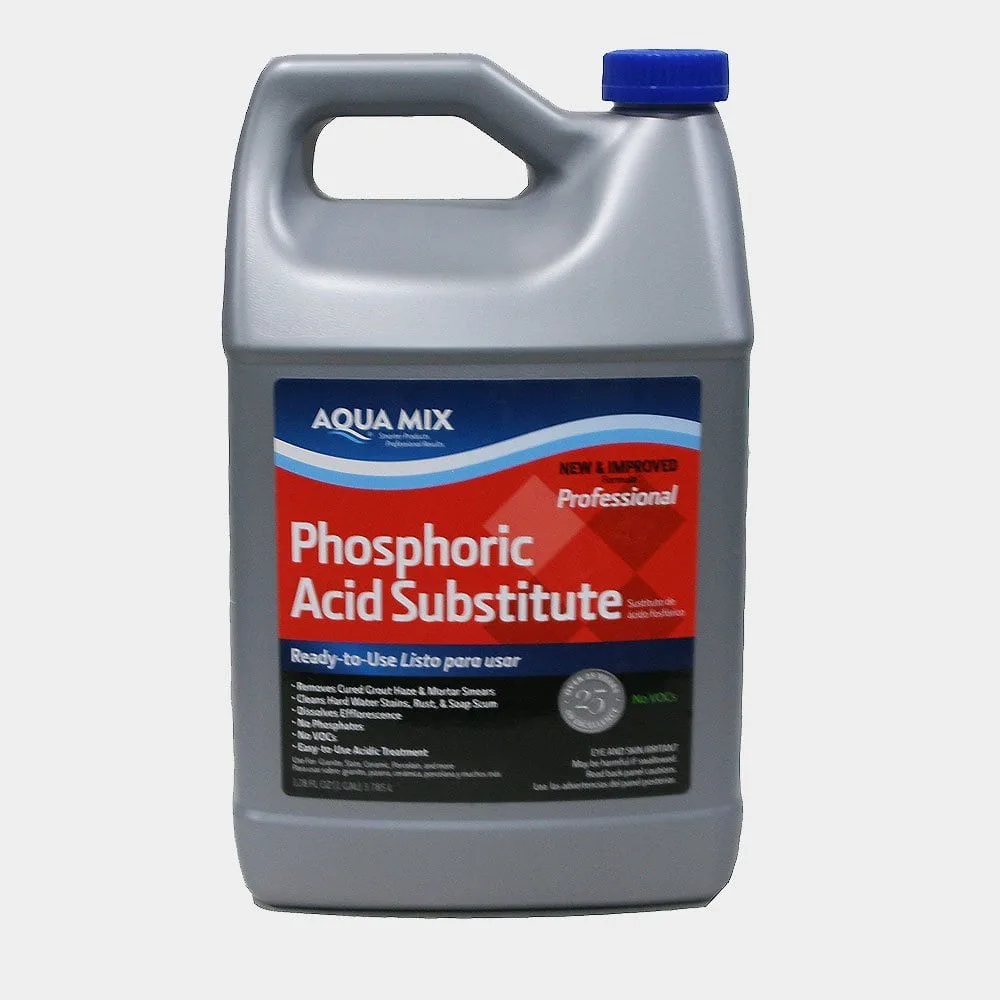
This grout haze remover can be diluted with water so just follow the dilution instructions on the bottle and your good to go.
For tougher stains just pour in a little more, no one will ever know *wink, wink*.
Apply it using the instructions I listed above and you should be good to go.
To order any of these products just click the images for your chosen product.
If you do not want to use Aqua Mix products is a link to all the grout haze removers available, simply choose which one fits your requirements.
Be sure to read which tile materials the products are safe to use on as you do not want to damage your tile or grout surface!
The list of grout haze removers is here.
Following these instructions and using the right grout haze remover you should be able to clean your tiled surface in a few hours at the most.
In Conclusion – Remove Grout From Ceramic Tile
As crucial as grout is to a tiled finish it can also be it’s number one enemy.
Whether it is cracking and dirty or its been left to dry on the surface of the tile, grout can easily ruin the lustre.
Thankfully any and all grout problems can be remedied with the right grout removal tools and grout haze removers.
This extensive grout removal guide covered all of that in hopes that it will provide all the information you need to fix your grout.
While it states how to remove grout from ceramic tile, all the tips and information found here can be applied to all tile finishes and materials.
We started with removing grout from ceramic tile and covered the best grout removal tools from powered to hand tools.
With information on all the best grout removal tools and where to find the lowest prices, you should have all you need to remove grout.
Secondly, I gave instructions on how to remove grout haze and listed the best products to use for this task.
Hopefully, it made you realise that removing the pesky film isn’t as hard as imagined.
With the right procedure and product, you can remove any grout hazing from your tiles and natural stone without calling in professional help.
Please feel free to send me any before and after photos of your grout removal jobs, I would love to see them!
With that I wish you all the best with your grout removal projects and that you now know how to remove grout from ceramic tile!
Happy Cleaning!
Want more grout removal tips?
Check out my article on Tips for Removing Grout
I know you don’t wanna leave yet, why not give some of my previous articles a read, I guarantee they won’t put you to sleep.


10 Comments
Christine – October 29, 2017
I have a large format porcelain tile in my kitchen. Unfortunately it is a rough textured tile and I have the exact problem you described about grout haze. If I purchase the Aquamix Nano scrub product, do you think I can clean the tiles myself? I want to avoid hiring someone to do it for me. Thanks
Carl – October 30, 2017
Hi Christine, yes the Aquamix Nanoscrub grout haze remover should be able to remove all your grout haze off those porcelain tiles. It is an easy product to use and you can definitely do it yourself once you have a spare hour or two to tackle the task!
Remember to put on some gloves and long sleeved clothes to protect your skin, it’s best to be careful with any sorts of chemicals.
Since the Nanoscrub is more of a cream rather than solution I would avoid leaving it on the surface for too long so that it doesn’t dry up. If you remove it once it’s still liquid you will have a much easier time washing it off.
Once you have the product just read the guide I have written above and you should be able to get those tiles sparkling clean in no time!
Greg McHolland – July 24, 2018
We have ceramic tile in our home. I don’t know how to remove the grout haze from it.Thanks for sharing these article. I found it very helpful. Now, I think my problem for having dirty ceramic tiles is resolved.
Karol Allard – December 3, 2018
I live in Costa Rica, I want to have grout changed. Will this cause a lot of dust? Should I cover cabinets and things?
Veronica – May 24, 2019
I live in Puerto Rico, The problem i am faceing is that my husband put in some new porcelain tiles in the Landry room. And left the grout a long time i would say more rhan 8 hrs. The grout is hard is there any product that can fix this problem. Please advice thanks
Carl Anders – May 28, 2019
Hi Veronica,
Can you remove the grout with a flat blade like a spatula? Since it is dried so much, you can try remove the large chunks of grout with a flat tool. You can try remove the grout residue and film with a specialist tile cleaner like this Aqua Mix Grout Cleaner. Please read the instructions carefully. You can also try a mix of vinegar in clean water and try scrub it off. Depending on the tiles, it should come off.
Davina – June 18, 2019
Hi Carl – Thanks so much for your writing, this is very informative. I have a related grout removal question. I have a collection of used vintage porcelain wall tiles (1960s) that I intend to use to tile a shower stall. Although the tiles were removed carefully and are all intact, they have some old grout and backing stuck to them. How would I best remove this material from these individual tiles? Thanks for any advice.
Carl Anders – June 18, 2019
Hi Davina,
Thank you for visiting my site and for the comment!
My favorite tool for removing grout and old adhesive from tiles is an angle grinder with a masonry grinding wheel. It is simply the fastest and easiest way to get rid of that stuff. Just be careful when you are grinding the sides of the tile, try avoid touching the glaze in case it chips off. I have never had it happen but it is possible.
I do have to mention that masonry grinding does get dusty! Be sure to do it outside and somewhere that you can easily hose off the dust. Use proper safety equipment and some sort of dust mask.
The old grout should come off very easily from the tile, just apply the grinder gently and it should come off. The adhesive on the back will take a bit more work but will come off as well. Just remember to take your time, grind small areas at a time and you’ll have your tiles cleaned up in no time!
Thank you for reading, all the best with your bathroom project. I’m sure it’ll look great 🙂
Carl
Kristina – August 26, 2019
Hello!! I am having a grout haze problem so this article has been very helpful. My question is, should I seal the grout and caulk around the tub before I use the nano product?
Carl Anders – August 26, 2019
Hi Kristina,
Thank you for the comment and I’m happy to hear the guide has been of help to you.
There is no need to seal the grout or caulk before using the product. If you want to be sure that it won’t do any damage, you can do a spot test in a non conspicuous area and see if there is any discoloration. While this has never happened to me, you can never be too safe!
I hope your grout haze clean up goes well and you restore your tiles to their original beauty!
All the best,
Carl.
Marie – October 18, 2019
We had natural stone porous tile installed & a pre sealer wasn’t used first & some of the grout got on the tiles & dried What is the easiest way to get this off ?
Carl Anders – October 20, 2019
Hi Marie,
It’s concerning that no sealer was used on the natural tiles before they were installed. Pre-sealing is essential to avoid scarring the tiles with the various products that are used during the installation process. I’m very surprised the tile setter didn’t do this. As to what products you can use, it greatly depends on what type of natural stone it is as each material has it’s own tolerance to chemicals.
You could try a mild mixture of vinegar and baking soda and spot test it to see if no discoloration occurs. If it passes, try giving the haze a scrubbing with the mixture and cleaning it off. If that fails to work, a stone safe tile cleaner would be the next step. Again, spot testing is crucial.
Hopefully that does the trick, please let me know if you need further assistance. You can also contact your tile setter who installed the tiles to try cleaning it off.
Judy – April 29, 2020
Hello Carl. We had a professional gut our shower down to the studs and rebuild with new 1224 porcelain tile. In a few areas, too much of the new grout was wiped away resulting in “ledging” so we have asked the company to correct this. However, I am concerned that either they won’t fully remove the old grout; they will scratch or chip the tile or they will not match the new grout to the original grout (standard color).
Which will be worse: leaving the underfilled grout lines as is or Potentially creating worse problems by replacing the old grout?
Carl Anders – April 30, 2020
Hi Judy,
Thanks for visiting my website and for the question.
If the shower was recently rebuilt, then it should be okay for them to come back and fill in the under filled lines without any issues. They shouldn’t need to remove the old grout, just touching up the low areas with fresh grout should do the trick. As to color difference, if they use the same brand that was used originally, then there should be little to no color difference.
Of course this all depends on how long ago the tiles were laid. If many months have passed then the existing grout will have darkened slightly from use and the new grout will be apparent until it also ages and darkens.
At the end of the day, you have a visual problem and nothing major that will effect the long term performance of your tiles. The tiling company should be able to remedy your problem without too much hassle and produce the result you’re wanting without damaging your tiles.
I hope that has answered your question, please let me know if you have any further concerns.
Carl.
Sharon Petty – September 29, 2020
Great information! I hired a professional to install white ceramic tile tub surround with a medium gray fusion pro grout. The installer didn’t follow the manufacturer instructions and now my beautiful white tile are hazed with gray. The installer left it hazed overnight. The next day he tried a non-acid haze remover but was unsuccessful in cleaning. That was the last time I saw him. Now I’m left to try and salvage my tile. What can I use? Thanks!
Carl Anders – September 30, 2020
Hi Sharon,
Oh no, he left epoxy grout to haze over! Shocked and dismayed face He deserves a kick up the backside for doing such a thing, that and leaving you with his mess.
That’s a big no-no with epoxy grout, especially Fusion Pro which has a universal reputation with us professional tiler’s as the most difficult epoxy to work with (sorry guys that created Fusion Pro.)
If the hazing isn’t thick, you could possibly remove it with an epoxy grout haze remover like this one. Just follow the instructions and buff it with a clean microfiber or cotton rag.
That should hopefully fix the hazing!
Sharon Soucie – January 20, 2021
just tuned into your site. very informative. I have a dremmel and the carbide bits safety glasses gloves and I’m ready to start removing the sanded grout from the bathroom walls. I was wondering if there is such a thing as a guide that helps to keep the tool level and against the ceramic tiles.
thanks for your guidance.
Carl Anders – January 24, 2021
Hi Sharon,
I’m pleased the article has helped. Unfortunately there isn’t really any sort of guide that can help. There is this drilling guide but I’m not sure how effective it would be with tiles. My only suggestion is to turn the power down (if the tool has variable speed) and go as slow as possible until you are comfortable with the machine.
Jamie – January 20, 2023
Hi. Is there any cleaner that will remove Fusion Pro grout haze on my quartz countertops? We just spent tons of money on a kitchen redo and now I have this on every countertop in my kitchen and laundry room. I am devastated. Thank you.


Leave a Comment
Your email address will not be published. Required fields are marked *
Comments are currently closed for new submissions.