
Tilers Place is reader-supported. When you buy through links on this page, I may earn an affiliate commission on qualifying purchases.
Part 2 – The Emails Edition
What Is Ask A Tiler?
Since starting this tiling website, I have been getting many messages, emails and private communications across various platforms about various tiling topics.
Anything from asking if the tiler laid their porcelain tiles correctly, to how someone should layout their tiles and just about anything in between.
This is the email edition with all the questions coming from my email account featuring the original communications from both sides. I have selected the most interesting emails that should hopefully help out more people than just the original sender.

This is the second edition of Ask A Tiler is a culmination of all those questions I have been asked over time and my replies to them as a professional in the industry.
If this is your first time visiting Tilersplace then please allow me to introduce myself. My name is Carl Anders and I have been tiling professional for over 25 years and this website is my attempt at passing some of my knowledge onto you.
In that time I have completed countless projects involving all forms of tiles from porcelain, ceramic, natural stones and ecaustic tiles. Witnessed many renovations miracles and nightmares and endured tougher deadlines than anything you’d see on reality tv.
Over those years I have learned a lot of tiling and home renovations in general and figure I’d put my knowledge out there for whoever needs it. The internet has taught me countless things so it’s my way of giving back.
If one of your burning questions isn’t answered, simply drop me an email in the contact section above or ask it below in the comment section! It might even feature in the next edition.
Alternatively, use the search bar on the homepage to browse my extensive collection of tiling tutorials and tool reviews that you won’t find anywhere else!
So without further ado let us begin the first Ask a tiler question and answer session!
Want your questions answered on Ask a Tiler? Simply get in touch or drop a comment below! ?

Question 1: How To Clean Stained Tiles
I have spots of dried grout and adhesive on a just completed outdoor project. The tile has a diamond pattern which is indented into the tile. These indentions contain the dried grout and some adhesive. Any suggestions for removing them without damaging the tiles?
– James S
Carl’s Answer:
Hey James, congrats on getting your outdoor tiling done!
Do you know if these tiles are porcelain? Or are they a natural stone tile?

Whichever material it may be will depend on the product to use for the job but in short, yes, you should be able to remove the dried grout and adhesive off the tile without damage. I hope the tiles are not extremely porous with tiny holes as once grout and adhesive get’s in those pores, your only option is removing it with a needle (been there, done that, never again!).
Anyway, if You have a proper porcelain tile then the removal should be fairly easy, it will just require some elbow grease.
A safe product to use for porcelain and natural stone would be Phosphoric Acid Substitute by Aquamix. It’s a more friendly version of the real acid and is designed to remove such stains off tiles. I use this stuff quite a lot and it does the job most of the time, it’s only when the stains are really bad on a bad tile that I need to result to acid.
A more heavy duty cleaner would be something like Heavy Duty Acid Cleaner by Miracle Sealants. This one is stronger but please note it is a real acid and is dangerous to use. You would need to use this one with extreme caution as it can burn and do damage if not used correctly.
When you have made a selection, follow the instructions on the bottle and use a stiff brush to agitate the solution into your tiles that contain the stains. I tend to just scrub until the stains come off and then hose it all off with a lot of water. Try to avoid letting the run-off water enter any storm-water drains and flower beds.
If you have a natural stone or highly polished tile, I suggest you test a patch first to see if it damages the surface or creates scratches. I know some tiles can get scratched from a stiff brush but if you used an outdoor tile, I doubt it’d be highly polished.
Also remember to use correct safety equipment like long sleeved clothing, eye goggles and good shoes to avoid any of the products splashing onto your skin.
I think either of those should do the trick, it’s a combination of a good product and elbow grease from you that will lift off those stains. Unfortunately I haven’t come across a product that can lift such stains off tiles without any work from me. Tile glue and grout love to stick to tiles and need proper work to remove once their dry. It’s just the way it is with these things.
Before you do any cleaning with those products, allow the tile grout (in between the tiles) atleast 3 days to cure properly. You can also test the grout in an area for color-fastness but it shouldn’t be a problem, more of a precaution.
Lastly, if all this seems a bit to overwhelming or you are unsure, you can always call a local tile setter to do the work for you or give advice.
Hopefully that is of some help to you James, I appreciate the visit to my website and the email.
Good luck with the stain removal, I hope you will get those tiles clean and enjoy your new outdoor area soon!
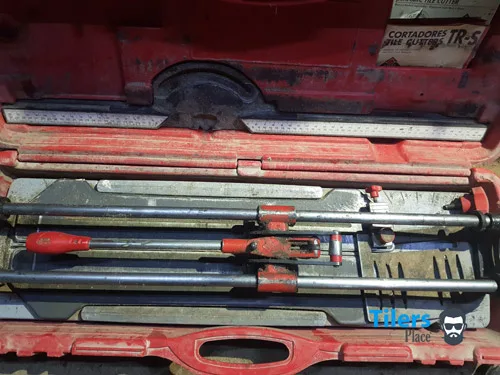
Question 2: Rubi TR-700-s
Carl,
Do you have any experience using the Rubi TR-700-S. It is the previous version that appears to have been replaced by the TR magnet. I have an opportunity to purchase the discontinued model new and was looking for any feedback you may have.
Thank You
– Gabe
Carl’s Answer:
Hi Gabe, nice to hear from you buddy.
Yup, you are definitely right. The TR Magnet replaced the TR-S line of cutters recently but apart from the cutting head and a few small bits, its the same machine with the same capabilities.
Yup, you are definitely right. The TR Magnet replaced the TR-S line of cutters recently but apart from the cutting head and a few small bits, its the same machine with the same capabilities.
I own two TR 600-S tile cutters which are exactly the same as the one you’re looking at, just have a 10cm smaller cutting base.
I was using the TR 600 right up to this year until I purchased the TR-600 Magnet (I’m a sucker for Rubi products and wanted to try it).
The older TR-600 is a brilliant tile cutter in my opinion, cuts the large 24×24 inch (600cmx600cm) tiles without issues and smaller ceramics with ease. Ive been using the TR line for a decade or more and never had any issues with em.
The only thing is that its a heavy beast but once its setup, you don’t worry about it.
By the way, yours wont look as dirty as mine. Its just all the grease that dried up while sitting in storage.
Let me know if you have any other questions, I’m happy to help where I can.
If you end up accepting that offer on the TR-700, don’t forget to get a cutting blade for it. Most don’t come with one in the box.
I don’t think the Rubi will you let down, its a seriously professional tile cutter and it holds its own. Id be still using mine daily if I wasn’t such a sucker for new toys.
Just keep her well lubricated, give the screws a tighten every once in a while and she’ll go for years.
Question 2 Part 2: How To Cut Tiles
Thank you for the reply. I received my TR-700 the other day and tested it out on a few small pieces of tile I had lying around and it worked great. I have yet to try cutting my full size (12 X 24) tile I plan to install. Any advice on using the TR-700 on 12 X 24 glazed tile? What size cutter wheel to use? Also where should I place the breaker bar when I am ready to snap the tile? Up at the top or somewhere in the middle?
This is my first time using a manual cutter as I have always been a wet saw guy.
Also i want to tell you how much I appreciate you taking the time to put real, honest reviews of products up on the internet. There is so much poor and unreliable information out there so to see someone like your self taking the time to do this and to answer questions is a great thing and it is appreciated.
Thanks Again,
Gabe
Hey Gabe,
That’s great to hear you are happy with the TX-700 so far!
Cutting glazed tile with a tile cutter is the same method as any other tile. Make sure you have it lined up flush with the top bar and score a line through the whole tile from end to end. You want the score line to cover the whole tile as this will give you clean breaks.
For cutting wheels, I prefer to use a smaller size like a 10mm like this one. The TX cutter uses the TX/TM line of blades so when you are buying one, make sure it says those letters. You can always ask at your nearest tile store to make sure. Rubi says that the bigger blades like the 22mm are good for textured tiles but honestly, I just roll with the 10mm for everything and it cuts em all. I usually replace the blade every 3-6 months, you’ll notice when its getting blunt or cutting weird but it all depends on how much you use the cutter.
In regards to where you place the breaker bar, somewhere near the top is best. In time you will learn that some tiles need coaxing with gentle pressure on sections of the tile. So you can apply some pressure near the top and then near the bottom and pop the tile. In general, most tiles pop nicely with just pressure near the top.
This is a skill you will learn in time Gabe, every tool has it’s tricks and the tile cutter is no exception. Remember that we come across a whole range of tiles and some are absolute garbage and you need to learn their quirks while you cut them. Every time I come across a new tile, I cut it carefully and see how it behaves. Once I got it figured out, I can cut with confidence.
Some tiles can break and leave an uneven edge below the glaze, if this happens you’ll need to shave off the excess with your grinder or hand held tile saw. It happens sometimes but it’s not too common.
Just take it slow, learn your new machine and before long, you’ll be cutting like a veteran. Let me know if you have any other questions!
Your kind words mean a lot Gabe, I really appreciate it!
It’s a lot of work keeping this site going and creating those reviews, hearing that my work actually helps someone makes it all worth it!
And yes, I know all about the unreliable information online, one of the reasons I started the site to begin with was how angry I got at the load of crap floating around online. A lot of people put out information and it’s clear they have never laid a tile or even held one in their hands! Anyway, I’ll save you the rant, otherwise I’ll never stop.
I hope you enjoy your new tile cutter and learn to get the most out of it soon, if you run into trouble, I’ll try help you as best I can.
All the best,
Carl.
Question 3: Best Knee Pads For Large Legs
Thanks for the excellent knee pad reviews!
I’m definitely going to buy your #1 recommendation (NoCry) for several members of my crew, but I have a couple of guys who tip the scale at 260-270 pounds. They spend a lot of time on marble floors doing grout and caulk repair. What would you recommend for the larger sizes?
– Bruce W
Carl’s Answer:
Hi Bruce,
Thanks for visiting my site and reaching out! Always great to hear from my readers.
Hmm, that’s an interesting question!
First thought that came into my mind was leather knee pads. Since they have no hardcase form, they are able to conform to any sized leg/knee and since your guys will be working on marble which is easy to scratch, the soft leather should not do any damage.
Make sure they keep em clean though! If the knee pads get caked in grout/thinset etc, those dried up bits of crud could scratch the marble.
NoCry also produces a non-marring knee pad which is similar to the Pro ones I talk about but they have much thinner padding and with your tough boys using em daily, the padding will flatten pretty quick.
Check em out anyway, they might work for you.
For leather knee pads, there’s a couple you can look at. They’re similar but have different layers of felt which reflects the pricing.

There’s the Heritage Leather Knee Pads that I reviewed and still use or the cheaper Custom Leather Craft knee pads. Those ones are abit more narrow so that might be a concern if your boys have wider knees.
I’ll keep thinking and will review my notes, if I find another pair that would suit your boys and their needs, I’ll let you know.
Hopefully these suggestions will give you something to go on You can always try one of the pairs that I have suggested and if they don’t fit, return em and give another pair a whirl.
Thanks for reaching out, I hope that helps you make an informed decision!
All the best,
Carl.
Question 4: Best Knee Pads For Electricians
Hi Carl,
My son is a second year apprentice electrician and is in the ceiling a lot of the time wiring, but he needs a good knee pad that stays on with grip so he dosen’t slip off and is comfortable, what would you recommend for him?
Thanks Paul
Carl’s Answer:
Hi Paul,
Thanks for reaching out, it’s great to hear from you.
That’s a great description of his work and I might have a few idea’s for him.
Since he isn’t kneeling on hard masonry surfaces like us tilers do and he requires grip, he’ll be better off with a soft shell knee pad without a plastic outer cap. Anything with a plastic face is a big no-no as plastic won’t provide any grip and will be slippery. Especially concerning when working in high places.
Nocry makes a soft knee pad with a textured leather face that should provide him with more grip. You can view them here. They are quite a nice knee pad and on the cheaper side.
If you want to go with a big name, DeWalt makes a nearly identical set of knee pads, same buckling system and foam padding and similar price. One more to check out would be the Ogreshield Knee Pads that I reviewed recently. They are very comfortable around the knee and don’t feel to heavy across long periods.
Lastly, you have this pair of knee pads from Troxell. They’re nice and soft and have a wide surface area. The one large strap is considered more comfortable as well. Sadly these guys are much more expensive over the overs I mentioned but worth the price.
Hopefully that give you something to go on Paul, I hope you manage to find a pair of knee pads for your son and it helps him work comfortably and safely 🙂
Thanks for contacting me and visiting my website, it’s highly appreciated.
Kind Regards,
Carl.
Question 5: Tile Leveling Systems
Hello,
I just finished reading your most informative article regarding tile leveling clips.
OK, I’m sold and it’ll probably be better than a piece of 2″ x 4″ and a rubber mallet. I noticed that you didn’t review the Pearl Tuscan Clips.
I recently saw these at my local Tile Outlets of America store. They’re a 1 piece system and since I’m not a pro, having reusable wedges after the job isn’t an advantage. What is your opinion of this product and how does it rank against Raimondi?
I need clips for 425 sq ft of bedroom / bathroom floor tile. I’m using 12″ x 24″ tile over a concrete slab floor. Thank you!
Carl’s Answer:
Hi Allan,
It’s great to hear from you, I appreciate you reaching out. I’m thrilled to hear you found my review informative and helpful.
Haha, don’t discount the rubber mallet just yet! I would however discount the 2×4 and instead use a spirit level. If you will be tiling somewhere where slopes are vital or the floor is particularly nasty and uneven, then you will definitely want to keep an eye on your levels. In terms of the rubber mallet, you can use it to remove the clips after they have set (or just use your boot – it’s my preferred method and a great stress release in the morning).
Well I admit that you’ve got me there!
I’ve never heard of the Pearl Tuscan Clips but I’ve gone and checked them out online. The concept is definitely unique and I can see it’s uses. I believe for your size of tile they should do the trick as they should be strong enough to work out any imperfections. They don’t offer the same amount of adjustability and possibly strength that the Raimondi (or similar) system provides but that is only an educated guess since I’ve never worked with them before. The Raimondi type systems give you a larger surface area and the pliers allow you to tighten up the clip more as opposed to just pushing the sides into place on the Pearl System.
Since you are using a relatively light weight tile and not stone, I’d wager that the Pearl’s should do the trick. You can always purchase the smallest bag possible and see how they do. Judging by online reviews, their a good product. If you decide you require a plier type system like the Raimondi, you can always try sell the pliers and wedges at a later date. I’m sure someone would be interested. DIY and Renovation groups on Facebook are good places to start.
I hope that gives you something to go on. If I come across the Pearl Tuscan Clips, I’ll give them a whirl and tell you what I think of them.
All the best for your tiling project, I’m sure it’ll come out great.
Thanks for the email and visiting my website.
– Carl
3 Comments
Bonnie – November 21, 2020
Laid shower tile/stone with mesh backing. In some places the thin set is even with stone. Can I grout as is or do I need to try to remove some thinset. It is a week since doing that so thinset is hard.
Carl Anders – November 22, 2020
Hi Bonnie,
Yes, its very important to remove any thinset that is present between the tiles. I find a craft knife/utility knife with snap off blades work the best for cutting out thinset.
Leaving the thinset in place will result in visible patches in your grout where it sticks through and weak grout in areas as it’ll be too thin.
It’s unfortunate you left it a week as this process should be done the next day whilst the thinset is not fully cured. It will be a lot more difficult now as the thinset has reached it’s full strength.
Just take it slow and remember that you’ll be looking at the floor for many years to come. If you put in the work now, you’ll have a flawless floor that you’ll be proud of, rather than a patchy one that you’ll be annoyed with every time you shower.
All the best and thanks for visiting.
PAULINE – March 10, 2021
I took off my laminate that was my backsplash and maybe I should not but I did I am trying to tile my backsplash do I use the primer grip and then put my tile with thin set mortar I’m lost or do I put backing
Carl Anders – March 11, 2021
Hi Pauline,
If the surface is solid without any holes etc, you can tile directly over what you have exposed. If the laminate residue is very tacky/sticky, you can use Mapei Eco Prim to prime the surface. Once that is dry, use a thinset mortar that is suited for wall tile. Any home renovation store should have what you require. After that, grout the tile, apply some silicone around the edges and you’re done.
Let me know if you have any further questions.
lisa – March 26, 2022
I have ceramic tile that we hand painted what kind of sealer can I use that will hold up in the kitchen wear it will need to be wiped down daily?
Carl Anders – April 1, 2022
Hi Lisa,
Tile sealers unfortunately are not made to seal paint so I can’t provide you with an answer. Looking at it from a DIY perspective, I reckon a product like Wessex Permakote would be better. It’s a clear epoxy coating that forms a tough and thick surface that won’t wear off and protect anything. I’ve never used it over tile before so please do your own research and tests before committing to the project.


Leave a Comment
Your email address will not be published. Required fields are marked *
Comments are currently closed for new submissions.