Table Of Contents
Tilers Place is reader-supported. When you buy through links on this site, I may earn an affiliate commission on qualifying purchases.
HOW TO CHOOSE THE RIGHT TILE CUTTER : COMPLETE GUIDE
Picked out some tiles for your next project?
Not sure how to cut them?
This guide is for you!
From Marble to Ceramics and everything in between, this guide is aimed to provide you with the information you need to choose the right cutter or saw for your next job.
How To Use This Tile Cutter Guide
This guide is designed to tell you which tools are best to cut your tile, from straight to detailed cuts. Simply click on your tile and learn!
If you want to know the best products for cutting tile quickly, then go to my quick start guide.


Introduction – A Look At Tiles
Tiles have become a very popular and proven choice for covering a wide range of substrates in both residential and commercial locations. Their hard wearing finish and endless range of designs mean there is a tile for every location and situation.
We all know tiles are made from refined clay however the additional processes the tile goes through after initial formation is what truly defines that tile.

With every different process there comes a different degree of strength to the tile and it’s workability is greatly affected by these processes.
Throw in tiles made from natural stone like granite, and you have a true diversity of surfaces that you need to work with and figure out how to inevitably cut.
Now if it is your first time working with tile, not matter which finish or material it is, you will undoubtedly be thinking “How on earth am I going to cut this?”
Maybe you have worked with tiles before but have decided to tile your bathroom in a natural stone and have quickly realized your old tile cutter will not even put a dent in these thick behemoths.
This is where my guide comes in.
I will provide you with the knowledge to wisely choose the tools you will need for your next tiling project and point you towards the best to ensure you get a beautiful result with the least amount of work.
First up I will provide a quick guide to get you started on your selection and get you on your way.
After that I will lay down thick slabs of tasty information that will enable you to make an informed decision on your tile cutter acquisition and ensure you get the right one, first time!

Hi, my name is Carl and I have been tiling professionally for over 25 years.
In that time I have cut pretty much every material you can possibly cover floors and walls with and even a few that you shouldn’t!
I have gained a wealth of information in those years and I want to provide you the power to make the best and right decision on your next tile cutter.
Tile Cutter Quick Start Guide
If you want to jump to the information right away please view the list below↓
It will provide you with a basic guide to quickly find the cutter(s) required to complete your next job. Simply find the material you have and match it to the cutter.
Manual Tile Cutter
Manual Tile Cutter – USE FOR STRAIGHT CUTS
Able to cut these materials:
- Ceramic
- Porcelain
- Glass
- Terracotta (suitable cutter required like the TX-700-N)

Recommended Products:
Cheapest Option: QEP 24 Inch Tile Cutter – Ideal for small ceramics/porcelains
Medium Tier Option: QEP 35 Inch Manual Tile Cutter – Ideal for Large Ceramics
Best Option: RUBI TX-900-N 90 Inches – Ideal for Large/Jumbo Porcelains
Alternative Option: RUBI TX-700-N 70 Inches – Ideal for Large Porcelains
HandHeld Tile Saw/Angle Grinder
Hand held Tile Saw/Angle Grinder – Wet or dry – USE FOR DETAIL CUTS
Able to cut these materials:
- Ceramic
- Porcelain
- Glass
- Terracotta
- Mosaics
- Natural Stone

Recommended Tile Saws:
Cheapest Option :Ryobi 4 Inch Tile Saw
Medium Tier Option: DeWalt DWC860W
Best Option: Hitachi CM4SB2
Cheapest Option: Bosch Corded Angle Grinder
Medium Tier Option: Milwaukee 6130 Corded Angle Grinder
Best Option: DeWalt DCG413B Cordless Angle Grinder
Wet Tile Saw
Wet tile Saw – USE FOR STRAIGHT CUTS
An all-round best choice for consistent results.
Able to cut these materials:
- Ceramic
- Porcelain
- Glass
- Terracotta
All forms of natural stone including:
- Slate,
- Marble,
- Granite etc.

Recommended Products:
Cheapest Option : Skil 7 Inch Table Saw
Medium Tier Option: Dewalt D24000S
Best Option: Rubi DC250
Alternative Option: QEP 24 Inch Brutus
Back To Basics

So she finally got to you, didn’t she?
Months of discussion, driving her to tile stores and Home Depot to check out tile samples, arranging them on the bench and tripping over stacks of home and garden magazines stacked in your throne room.
She finally got into your head and you agreed to tile that kitchen back splash.
After all, you know your way around a tool shed, know what most of the tools are at Home Depot and even have a few in your work shop/ man cave.
You built Timmy his tree house and fixed more than your fair share of things around the home, so how hard can it be to tile right?
You got your mastic glue, a bag of spacers and trowel and get to work. All goes well, you have a few tiles in and your wife is commenting;
“oh, it’s beautiful love”
It’s then when you run into the big problem. You realize your tile is covering the electrical outlet…
“How Am I going to cut this tile!”
After trying to nip the shape out with some tile nippers you realize you’re stuck.
“I know! I’ll take a look on Google” Your wife says as she pulls out her phone.
If this is you and you have indeed found my guide after such a problem or similar then welcome.
You have come to the right place!
First of all, if you truly are desperate and need to know how to cut a hole around an electrical socket or otherwise.
Read On ↓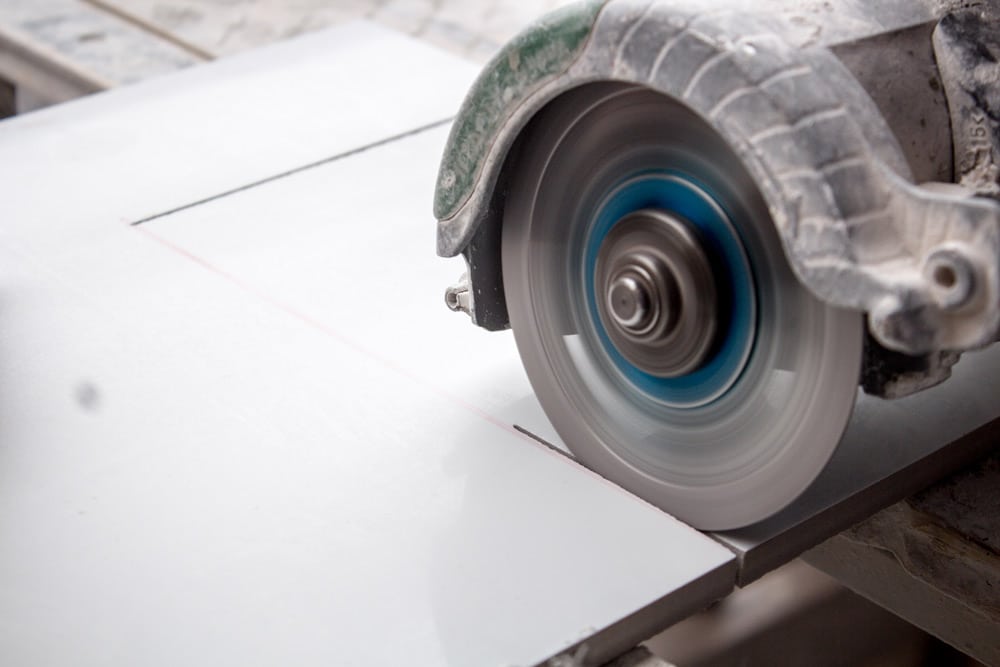
Any cuts that require more than one line cut into the tile or anything like a round hole you need a Tile Saw. It will perfect for such cuts and are very affordable.
If the electrical socket is in the corner of the tile then mark out the area you need to cut then make the two cuts from point to point until the cuts meet.
If the socket is in the middle of the tile then cut into your marked area and follow your marked lines until you have 4 cuts in the tile and they meet at their points.
Usually, you will need to flip the tile over and continue to meet the cuts on that side.
Once all four lines are connected flip the tile back over and try tapping the square of tile out.
Just remember, before you rush out and buy a tile saw make sure you have a decent diamond blade for it as well.
If you want to make an informed decision on which Tile Saw to get please read my Top 4 Tile Saw Review to find which one you will require otherwise take a look above at the suggested tile saws.
For all of you who are in the midst of planning a tiling job or have one coming up and you will be working with a material you have never worked with, continue reading and I will go through all your options and give you tips on cutting every tile type.
Ceramic Tile
A Brief History of Ceramic Tile

Ceramic tile is one of the softest forms of traditional tiles available on the market and one of the easiest tiles to cut.
Back before Porcelain was invented nearly all jobs I did involved ceramic tiles. They were cheap to produce and widely popular as the finished surface to have.
In the 90’s they were my bread and butter simply because back then there were not that many tile types around.
You had the more natural forms like Terracotta for outdoor entertaining areas and entrance ways while indoors had the more refined ceramic tile with a glazed finish.
Ceramic tile has become unpopular as a flooring surface due to the fact of its very high water absorbency.
Due to it being baked for much less compared to a Porcelain tile, the ceramic tile absorbs water like dry sand.
If that doesn’t sound so bad just remember not all water smells sweet.
Imagine you have ceramics in your bathroom. On the floor near your toilet or inside your shower stall.
Over time that thirsty ceramic will drink up all that not so sweet water and guess what.
It’ll begin to smell.
Really bad.
No amount of air freshener or scrubbing will remove the smell either as unfortunately it has penetrated into the tile and is here to stay.
The only way to get rid of the smell is to tear out the tiles and lay down a natural stone or porcelain.
Another side effect of this water absorbency is the tile becomes soft and brittle due to its structure being pulled apart by the water. I have seen many cracked tiles in shower bases due to this.
Simply put, it is not a good tile for wet areas or kitchens for that matter.
Apart from the water issue, it is overall a very soft tile with a glaze that is easy to chip.
How many glasses or knives have you dropped in your kitchen? Better hope you didn’t have Ceramic on the floor as if that object landed on it you’ll most likely have a large chip off the glaze or even a cracked tile.
Ceramic tiles are also banned from being used in any commercial or industrial application for these factors. It is not sterile or tough enough to withstand the demands.
So if their so bad, why use them at all?
It is not all bad with these tiles.
For instance, subway tiles have become very popular in modern design and plenty of tile manufacturers produce their version of a tile in that size and many of them are ceramic tiles.
In a kitchen or laundry, they make excellent back plashes as the amount of water hitting the tile isn’t enough to ruin their structural integrity or penetrate the glaze to create a smell.
Ceramic tiles are also very easy to work with and cut, hence why you may be here reading about them and installing them yourself.
How To Cut Ceramic Tiles?
I have laid more square feet of these tiles than I have eaten warm meals and after forty odd years on this fine old Earth, that’s a whole lot of hot meals!
So you can believe me when I say I know a thing or two how to cut these bad boys.
To cut Ceramic tiles like a regular subway tile or smaller format floor tile you will require:
The great part is that you won’t be requiring the top tier professional tools to cut these suckers so you will save a packet if you decide to do the job yourself.
Buying some cheaper tools for DIY home installations may prove to be cheaper than renting as you will have the tools on hand whenever you add more tiles or if you will need to make repairs in case a tile is broken down the line.
One thing I guarantee is tiles do break after installation, usually just due to regular wear and tear, so having your own cutter on hand will prove a big time saver down the track.
What Is Each Tool For?
Now that you know which tools you will need for the job, I will describe the use of each one so you know how to apply it to any given situation.
Manual Tile Cutter:
You will use this for straight cuts and it’s your go-to tool for cutting tile.
This tool is also called a tile snapper, snap cutter or tile hand cutter.
Ceramics are usually on the smaller end of the size spectrum with floor tiles rarely exceeding 12×12 inches so you can get a small tile cutter.
This tile cutter will be your main workhorse on your install with its ability to set up a size and cut multiple tiles to the exact same size every time.
This is great when setting up a brick format subway tile to get even half cuts.
Not only that but every time you come up to a hard surface and you need to trim a tile, the manual tile cutter will be on the job.
It’s ability to cut perfectly straight lines quickly and accurately is unrivalled by any other tile cutting tool.
The other advantage is you only need to scribe a small mark in order to set a size as opposed to a tile saw where you need to draw the entire cutting line in order to cut a straight line.
An ideal tile cutter for this purpose would be a RUBI PRACTIC 21 Inch for tiles under 21 inches or if you are going bigger this QEB 35 Inch Manual Tile Cutter will cut up to 35 inches.
These options are perfect ceramic tile cutters and will serve you well.
Remember that if you are cutting tiles diagonally you will need to measure the tiles’ length from top corner to opposite bottom corner to see if your cutter can accommodate the bigger size.
Hand Held Tile Saw
A hand-held tile saw is your go-to saw for anything beyond a straight cut.
If the surface you will be tiling has features like light sockets, wooden trims like in a doorway or round holes for a shower you will require this tool.
Operation of this tool is definitely not as easy as a manual tile cutter and it does require a lot of care, practice and skill so do not rush into your first cut.
You also have to mark out the cutting area in full so you have a clear line to follow when making your cut.
The tile saw uses a 4 inch round diamond blade to do the cutting so it enables you to cut virtually anything you require.
If your tile lands in the middle of an electrical socket you can easily cut into the tile and trim out the box, a manual tile cutter can only dream of doing this. It is literally impossible.
Also if your tile needs to be trimmed an inch or so then a manual tile cutter won’t be able to snap the tile cleanly.
In that case, you can use the cutter to score the line and then you will need to complete the cut on your saw. Alternatively, you can pull off the scribbed area with tile nippers.
If you will be cutting ceramic and are a casual user then a saw like the Ryobi 4 Inch Tile Saw will be a perfect fit for your requirements. It is very affordable and can easily handle the job.
If you will requiring the saw for a professional capacity or want to use it to cut more materials like bricks or pavers, then a Hitachi CM4SB2 wet saw will be your best option.
The CM4SB2 is ready for wet cutting so if you will be making extended cuts then you will be able to do so safely and without damage to your saw, blade or the material.
While you are making your purchases be sure to add a pair of safety goggles and ear muffs.
They are essential to use this tool safely as it throws up a lot of debris right into the eye area and creates a noise level rivalling that of an aeroplane taking off.
Tile Nippers
Tile Nippers are in essence a pair of pliers that are hardened with carbide in order to be able to cut tile.
They are the simplest form of tile cutting but still an essential part of the job. I use my pair every day.
Ideally, you will want two pairs of these. A standard pair that will be used to bite large chunks out of tiles for quick trimming of a tile and a parrot-beaked set for when you want to do more precise bite like a round hole.
For a round hole, I always use my tile saw to scribe the line and break the glaze of the tile. This helps the tile break how you want it and not break how it wants.
You can find your basic tile nippers here and a parrot-beaked set here.
All these tools should enable you to cut any ceramic tiles you will be using in your job.
If you will working will Terracotta then you will want to ONLY use the tile saw.
Terracotta tiles are very thick and only professional tile cutters like the Rubi TX-N series have enough breaking force to cut them unless you are requiring such a cutter for other projects involving porcelain tiles, a tile saw should be adequate.
Porcelain Tile
A Brief History of Porcelain Tile

Porcelain tile is the standard in tiles as it offers a very strong surface with a water absorbency rate of less than 0.5%.
This means they virtually take in zero any water making them ideal for wet area applications like shower bases and bathrooms.
They are also ideal for commercial applications like shopping centers due to their high tolerance of traffic and chemicals.
If you require a tile that will retain it’s characteristics for years on end and never take on smells then porcelain is the tile for you.
Its strength is all to do with the vitrification process which essentially turns them into glass with a solid internal composition.
This strength, of course, comes with a sharp increase in difficulty to work with them and a substantial increase in weight.
I remember when Porcelain tiles first hit the market and us tilers were ripping our hair out trying to install them.
Not only did the new tile technology come with increased strength but also increased size. Gone were the 12×12 tiles we were making our bread and butter with, now tiles were at least double that size.
Not only that but they were extremely difficult to cut.
Our tile cutters were simply rendered obsolete in a single swoop since most were not big enough to accommodate the tile and they didn’t have the breaking force to break these brutes in half.
These tiles were flooding the markets while tile tool manufacturers were scrambling to produce a cutter big and strong enough to cut them.
This ultimately meant customers that purchased the new tiles were often left with no one to install them as many tilers simply upped and left the job.
The tilers discovered they simply could not cut their client’s new porcelain tile with any of their tools and chose to abandon the job.
With no way of cutting tile, they had no way of finishing the job.
I was called in a lot in those days after the first tiler left the job and after trying to cut the porcelain tile myself, I did not blame them.
Early Porcelain tiles were made very badly compared to modern porcelain.
The first problem was if you even managed to fit the tile on your cutter, the tile would often break into three pieces instead of two.
They also had a tendency to send projectiles flying and I would come home looking like I battled a tiger with nicks and cuts all over my hands and forearms.
My wife turned into a skilled nurse with all the antiseptic creams and plasters she administered in those days.
If you decided to cut the porcelain on your tile saw you would find the blade simply couldn’t handle the dramatically stronger tile.
Either it would be buzzing away making no progress or simply burning up. Wet cutting only got you so far as well as we still had to use the same obsolete blades.
Eventually, technology caught up and we can now cut porcelain with beautiful results and relative ease.
It’s still difficult, at least now we can arm ourselves with the proper weaponry and cut porcelain tiles properly.
How To Cut Porcelain Tile?
Porcelain tile is one of the toughest tile materials on the market, second only to granite which is a natural stone.
Fortunately, with Porcelain, you can still use a tile cutter so any straight cuts can be done easily without the need of wet cutting every time on your saw.
To cut Porcelain Tile you will require:
- A Large Manual Tile Cutter
- Hand held Tile Saw equipped for Wet Cutting
- Table Tile Saw
- Tile Nippers
Installing Porcelain tiles is not recommended for an average DIYer as it requires a lot of professional grade tools to cut with any sort of ease or clean results.
If it is possible just remember to purchase at least 15% extra tiles to cover any wastage and cutting.
What Is Each Tool For?
Now that you know which tools you will need for the job, I will describe the use of each one so you know how to apply it to any given situation.
Manual Tile Cutter:
You will use this for straight cuts.
Porcelain tiles are a tough surface and sometimes results are unpredictable so every new tile requires a brief learning curve to understand it’s breaking characteristics and tolerances.
If unsure of the tile I tend to scribe the cutting line twice and when I go to break the tile I do it gently by rocking the lever harder with every pull to coax the tile to break.
This will help you to learn how much pressure the tile requires without applying too much and breaking a chunk off the tiles surface.
After you understand the tile, your tile cutter will be your main workhorse on your install with it’s ability to set up a size and cut multiple tiles to the exact same size every time.
Its ability to cut perfectly straight lines quickly and accurately is unrivalled by any other tile cutting tool.
The other advantage is you only need to mark a small mark in order to set a size as opposed to a tile saw where you need to draw the entire cutting line for you to follow during a cut.
An ideal tile cutter for this purpose would be a RUBI TX-700-N for tiles under 27.5 inches or if you require something even bigger then a Rubi TX-1200-N will allow cuts up to 47 inches.
Rubi tile cutters are my all-time favorite porcelain tile cutters and in my opinion the best tile cutters overall.
If you want to read more about them give my Rubi TX-900 Review a read for more info about Rubi Tile cutters.
Remember that if you are cutting tiles diagonally you will need to measure the tiles’ length from top corner to opposite bottom corner to see if your cutter can accommodate the bigger size.
If you need anything bigger than this then you will need to step up to a wet cutting Tile Saw or a Table Tile Saw consistent straight cuts.
Hand Held Tile Saw:
A hand-held tile saw is your go-to saw for anything beyond a straight cut.
If the surface you will be tiling has features like light sockets, door details or round holes for bathroom faucets you will require this tool.
If you have never cut porcelain with a tile saw then prepare for a much longer and difficult cut.
Not only will the wet cutting be an extra component to think about and look after but the cut itself is much longer.
Take your time and do not force the saw, let it make progress naturally and often a quick pass to just remove the glaze helps get a better result.
If you will need the saw to make consistent long cuts through the entire tile I would suggest you use a table tile saw.
The hand held tile saw will not provide as perfect a result as the table tile saw can provide plus it is much less taxing on you to use.
If you want a general tile saw for a mixture of ceramic and porcelain cutting with the wet cutting facility the Hitachi CM4SB2 is a great choice.
If you want the best in wet cutting saws with great wet cutting components then the Makita 4101RH is your choice.
While you are making your purchases be sure to add a pair of safety goggles and ear muffs. They are essential to use this tool safely as it throws up a lot of debris right into the eye area and creates a noise level rivalling that of a rock band at full volume.
Table Tile Saw:
A table tile saw is usually your best bet and ideal tool for cutting porcelain as it provides the best finish during a cut and ease of use is much greater over a hand held saw.
One factor you want to consider is how large are the tiles you will be cutting and purchase a table tile saw to suit.
Smaller table tile saws come equipped with smaller blades and are suitable to cut tile around 12×12 inches or less.
The great part is there a few less low-cost models that offer wet cutting so you do not need to invest a big amount if you won’t be using the saw often. It could also double as a back up saw to your large expensive table tile saw.
The table tile saw whether large or small provides you with a solid cutting platform and only requires you to feed the tile through rather than holding the saw like you would with a hand held saw.
This offers the straightest cut possible and most tiles cut very cleanly using this method. This means no splintered tile glaze during a cut.
If you are unsure of a tile, your safest bet is to cut it using a table tile saw, it is your safest bet and is the best option for cutting any sort of tile, especially stronger tiles like porcelain.
If you are going to be cutting smaller tiles then a Skil 7 Inch Table Saw will be more than adequate for the job however if you are going to need a bigger saw or use it often then a Rubi DC250 is a wiser investment.
The Rubi DC250 Is a single overhead rail saw and is a professional table tile saw. The rail system protects against “tray-wobble” when cutting large format tiles over 24 inches.
Tile Nippers
Tile Nippers are in essence a pair of pliers that are hardened with carbide in order to be able to cut tile.
They are the simplest form of tile cutting but still an essential part of the job. I require the use of my pair on a daily basis.
Ideally, you will want two pairs of these.
A standard pair that will be used to bite large chunks out of tiles for quick trimming of a tile and a parrot-beaked set for when you want to do more precise bite like a round hole.
While porcelain is a tougher material to nip it is still very possible if you take care and take time to learn your tile.
For a round hole, I always use my tile saw to scribe the line and break the glaze of the tile. This helps to control how the tile will break when you begin to nip pieces off of it.
You can find your basic tile nippers here and a parrot-beaked set here.
I use the straight nippers to break off a thin piece of tile after scoring it on the cutter, if the tile is soft enough it is possible other you will need to use your saws.
Natural Stone
A Brief History of Natural Stone Tile

Tiles manufactured from natural stone are the premium cream of the crop tile one can use in any job.
No one tile material can match the opulence and sophistication that natural stone provides to a room fitted with it.
As the name suggests it is cut from blocks of natural stone and due to the large variety of stone found around the world; there are colors and designs available to suit every need.
Natural stone tiles have been around since at least the 16th century and have always been a sign of wealth and exclusivity.
With this exclusivity comes the biggest difficulty in working with the material so care is vital when working with natural stone.
Sealing Is Essential!
A lot of natural stone comes unsealed with it’s natural surface exposed.
This means they are extremely susceptible to staining from your tile adhesives and grouts, inks and solvents.
Before starting any job you’re best bet is to use a penetrative sealer like this one from Aqua Mix. I have been using this product for years and has ensured it kept the natural stones surface resistant to any stains I may have caused during installation.
The last thing you want is to remove tiles after installation because a stain has entered this pores. No amount of scrubbing will remove the stain so do not bother.
This sealer maintains the stones natural look and renders it suitable for food preparation and serving areas.
There are also sealers that you can apply after to provide a higher sheen. Before sealing it is best to consult your client as to what finish they would like to achieve.
Sealing is Ideal for these finishes and more:
- Granite
- Marble
- Slate
- Travertine
- Unsealed Porcelain
- Limestone
- Saltillo
- Cement
- Masonry
How To Cut Natural Stone?
Due to the diversity in materials, the difficulty of cutting varies from tile to tile however you should all cut them the same way.
When I cut natural stone I do not even bother with a manual tile cutter.
The stone is simply too thick to break using that method so every cut is done on a wet tile saw for details and a table tile saw for everything else.
To cut Natural Stone you will require:
- Hand held Tile Saw equipped for Wet Cutting
- Table Tile Saw
- Tile Nippers
Installing Natural Stone tiles is not recommended for an average DIYer as it requires a lot of professional grade tools to cut with any sort of ease or clean results.
What Is Each Tool For?
Now that you know which tools you will need for the job, I will describe the use of each one so you know how to apply it to any given situation.
Hand Held Tile Saw:
For natural stone a hand held saw will not provide much use to you apart from the occasional detail cut.
If the stone is soft like a marble I am able to use it more however if it’s something like granite then I try to use it as little as possible and do as much as I can on the table tile saw.
The Hitachi CM4SB2 is a great choice if you need a versatile every day saw with occasional wet cutting.
If you work a lot with natural stone and want the best-wet cutting components then the Makita 4101RH is a better option.
Do not forget some ear muffs and safety goggles when ordering your tools. While wet cutting helps keep splintered to a minimum it still happens and the noise created is extreme. It is best to stay protected and safe during these operations.
Table tile Saw:
A table tile saw will be your go-to tool for this tile surface.
You will have a controlled environment to keep your heavy tile stable while you slowly perform your cut.
It offers excellent wet cutting facilities that will keep the blade lubricated and cool during the long cut. This also helps keep the surface from splintering during the cut.
Unsightly chunks missing from a tile near the cut edge will surely raise eyebrows from your clients so it is best to avoid it.
While you can use the smaller table tile saws for these cuts like the Skil 7 Inch Table Saw I find it barely usable for stone unless the tiles are very small so I prefer to invest in a proper table tile saw. Something like Rubi DC250 is a great saw that will provide years of service or if you want something more affordable the QEP 24 Inch Brutus works well as well.
If you will be investing in a table tile saw then you may like to read about the Barwalt Saw Shack. It will enable you to do all your cutting indoors hence removing most of the hassle of cutting on a table tile saw. You can read my review here.
Tile Nippers
Tile nippers will not be used too often in a natural stone job but can be used if the stone is thin enough for the nippers to grip it.
I am including them on the small chance you will need them but most often all cuts will be done on your saws.
Glass Tile
A Brief History of Glass Tile

Glass tile is another one of those inventions that when they first appeared on the market we had no tools to cut them nor was the material suitable for cutting.
The material is as the name suggests: glass.
And as any of you know, glass isn’t the easiest material to cut. It can be very unpredictable and unforgiving if done incorrectly or using the wrong tools.
It is commonly found in mosaic designs in all sorts of colours and patterns. This makes it very popular to use as a back splash or inset in bathrooms.
They are also becoming very popular in the smaller subway tile format and their use is becoming ever more commonplace.
Thankfully these days the glass quality is such that you can cut them easily with a simple manual tile cutter and nippers.
This wasn’t the case back in the day, however.
I vividly remember back when they first hit the market and they were made from the worst possible grade of glass. The type of glass which breaks whichever way it likes no matter how much you score it.
The tiles were in a larger subway tile format and I needed to cut them in half.
So I did it like any other tile: slapped it on my old Rubi tile cutter and scored a line. When I pressed the breaker down on it the tile just shattered.
I tried it on my wet handheld tile saw and as I began the cut it shattered again. Tried nippers on the off chance and same result.
My client rang up the store and asked how on earth is the tiler supposed to cut your tiles?
“Cut the tiles with a wet saw” They said as if it was the most obvious thing in the world.
Feeling very annoyed I took my client outside, submerged the tile in a bucket of water and while it was underwater I cut it, within a second or two it shattered.
Let’s just say my client was not impressed and returned the tiles to the store.
Fast forward some years and tile manufacturers have changed the glass quality and it is now able to be cut and the world is a better place for it.
It still requires a lot of care and attention as if are not careful you can remove the backing paint that hides the wall substrate and your trowel lines.
To cut Glass Tile you will require:
- Manual Tile Cutter
- Hand held Tile Saw equipped for Wet Cutting
- Tile Nippers
What Is Each Tool For?
Manual Tile Cutter:
The tile cutter will be your main tool of the trade for these tiles.
With it’s carbide strengthened scorer you can simply mark out your cut like any other tile and break the tile with the breaker.
This is particularly effective for larger tiles as you can work with them like any other tile. If the glass is thick and tough to break, try scoring an additional line over your first one and try again.
If you are working with mosaics which are much smaller, line the sheet on your cutter and perform a score.
Then just snap the individual tiles with a tile nipper.
Since most glass tiles are small a cutter like the RUBI PRACTIC 21 Inch will do the job nicely.
Hand Held Tile Saw:
A wet cutting tile saw can be useful for some mosaics as you can cut them much faster than the score and nip method.
However, you have to remember that some mosaics may crack or you may have some glass popping off the top surface no matter how carefully you cut.
The tile saw will also be useful if you need to cut round holes, details or anything special you can’t cut with a hand cutter.
If you know you will be requiring the saw ahead of time, try to get some extra tiles to act as insurance in case the tiles are difficult to cut and break often.
A tile saw like this Hitachi CM4SB2 that is equipped for wet cutting and versatile for everyday work will be more than sufficient for the task.
Tile Nippers:
The tile nippers you will be using will be mainly for mosaics and they are a different design to regular nippers.
These are specially designed glass cutting nippers with carbide cutting wheels on either end of the nippers to help cut the tile.
You use them as you would any other nipper and they prove especially effective for small mosaics as you can cut them clean in half.
A pair like these will work great and be a handy alongside your tile cutter for your glass job.
Final Words
Tiles are one of the most diverse materials so it is often times difficult to know what to use to cut them.
This is especially the case if you are a DIYer or tile contractor just starting in this trade.
I hope my guide has provided you will all the answers you needed as to what tool you will require for every tile material you will encounter on the job.
Armed with this knowledge, you’ll be cutting tile of any material without problems or worries.
If possible, practice cutting each new tile before beginning to see how they behave under the conditions.
Manual tile cutters are great as they offer the quickest straight cut and speed up the job considerably however they cannot cut everything.
Tile Saws are ideal for smaller straight line cuts and any details and for me they are my most essential tool.
With the ability to be used as either wet or dry saws and versatility to cut porcelain, cermaic and stone, there is no other tool that matches it.
If you feel a hand held tile saw is for you I highly recommend you read my review of The Top 4 Tile Saws, it will provide you with all the information you need to make a choice.
It is also the most comprehensive and factual tile saw review on the internet (atleast in my exhaustive searches.)
Table tile saws are the kings of the clean cut and will provide you will the cleanest and safest cut for all materials. They do come with the biggest trade off which is they have longest cutting time of all tools.
If you will be going down the table tile saw route you should check out my Saw Shack Review that discusses a product that allows you to cut tile indoors!
With time you will learn which one of your tools works best for what situation and you will get comfortable cutting whatever tile your client chooses.
Now that you are ready for anything, scroll back up the page, select some tools and get shopping!
All the products are available at Amazon and will be at your door before the next project.
Check out my product reviews below for the best tile cutters avaiable for your future projects.
↓Simply click on an image to know more↓


Just read your reply to my question on your Rubi TX-900 review. Thanks for the recommendation on the Rubi TS-40.
In regards to cutting glass tile, I never knew you can cut them on a tile cutter! We did a few mosaic jobs here and there and I would always dread em due to the fact I hated cutting the glass mosaics. I would use plain old nippers and half the time they’d break badly.
If I ended up getting the TS-40 could I use it for glass mosaics and other glass tiles? Sorry for the dumb question but I want to be sure.
Thanks.
Happy to help Ricky!
Yes the Rubi TS-40 is more than capable for cutting any sort of glass tile you will work with.
The scoring wheel is capable of scoring on tile as well as glass so it will ensure a clean break.
Remember if cutting the tile sized glass then you can use the breaker on the tile cutter but if you are cutting small mosaics, just score the line you need to snap all the pieces with your tile nippers.
You can snap them with the breaker but since they are mostly on sheets it makes it difficult to line up all the mosaics against the breaker.
Hope that helps Ricky!
Quality work there carl, I told my new assistant to read this as homework the other day. It’ll save me beating it into him. I approve of not listing grinders as cutting tools for these materials. For ceramic you could work them easily enough but we all know you need a saw for results that won’t get you thrown off a job.
Thanks for reading Chris.
I have seen you around the site, appreciate the feedback from another professional.
Haha thats a good one, I could come up with a test sheet you can use to see if he actually read the article or not! 😛
Yes my skin crawls when I see a grinder being used to cut tile, especially porcelain or natural stone. I have done it and I hate it. There is nothing a grinder can do that I can’t do on my Hitachi tile saw. I doubt the same can be said if the tables were turned.
Glad you agree Chris.
All the best with that new assistant! Make sure you have no grinders around for him to stick a blade on!
I actually had a complete brain melt moment today and forgot what i can use to cut glass tile XD Then I remembered you posted this article and low and behold theres a whole section about it! You saved my a$$ today Carl, I owe ya a beer.
Hey Carl, I wonder if you could help me with which tile cutter I need to get. I have 12×24 porcelain tiles that will be laid in a standard pattern. Are there any good tile cutters that can cut these things? Thanks!
Hi Henry, yes there sure are! If you are going to be doing a lot of work with that size porcelain tiles, I would highly recommend a Rubi TR-Magnet Tile Cutter. I have been using one for over 6 months and it’s cutting those tiles like butter. It’s a truly quality tile cutter for porcelains and ceramics. You can read my review here or buy the cutter here. If you are wanting something cheap you could get the QEP 35 Inch Tile Cutter but I warn you, you get what you pay for. Buy a lot of extra tiles and prepare for breakages.
Wondering if anyone has any ideas- I’m trying to cut through (thin- 1/8”) mother of pearl mosaic. I can’t figure out if I should treat it like glass tile? I’ve heard it’s fragile and cracks easily. Does anyone have any experience with this?
Hi Chelses,
Unfortunately I have never worked with this type of mosaic but I figure it’d be safest to treat it like glass tile and cut it accordingly. A glass blade for a grinder/tile saw would cut it the most cleanly but you could try scoring it with a glass cutter tool and then breaking them in half with some tile nippers. If you have a couple spare mosaics, I’d definitely test cutting some before going to work on the final design.
If anyone has worked with this type of material, feel free to share your experience 🙂